13 KiB
C++ Local Deployment for General OCR Pipeline - Windows
1. Environment Preparation
-
The source code used in this compilation and runtime section is located in the PaddleOCR/deploy/cpp_infer directory.
-
Windows Environment:
- Visual Studio 2022
- CMake 3.29
1.1 Compile OpenCV Library
You can choose to directly download a pre-compiled package or manually compile the source code.
1.1.1 Directly Download Pre-compiled Package (Recommended)
Download the .exe pre-compiled package for Windows from the OpenCV Official Website. Running it will automatically extract the pre-compiled OpenCV library and related folders.
Taking OpenCV 4.7.0 as an example, download opencv-4.7.0-windows.exe. After running it, a opencv/ subfolder will be generated in the current folder, where opencv/build contains the pre-compiled library. This will be used as the path for the OpenCV installation library when compiling the universal OCR pipeline prediction demo later.
1.1.2 Compile from Source Code
First, download the OpenCV source code. Taking OpenCV 4.7.0 as an example, download the opencv 4.7.0 source code. After extracting it, an opencv-4.7.0/ folder will be generated in the current folder.
-
Step 1: Build Visual Studio Project
Specify the
opencv-4.7.0source code path in cmake-gui, and set the compilation output directory toopencv-4.7.0/build. The default installation path isopencv-4.7.0/build/install. This installation path will be used for subsequent demo compilation.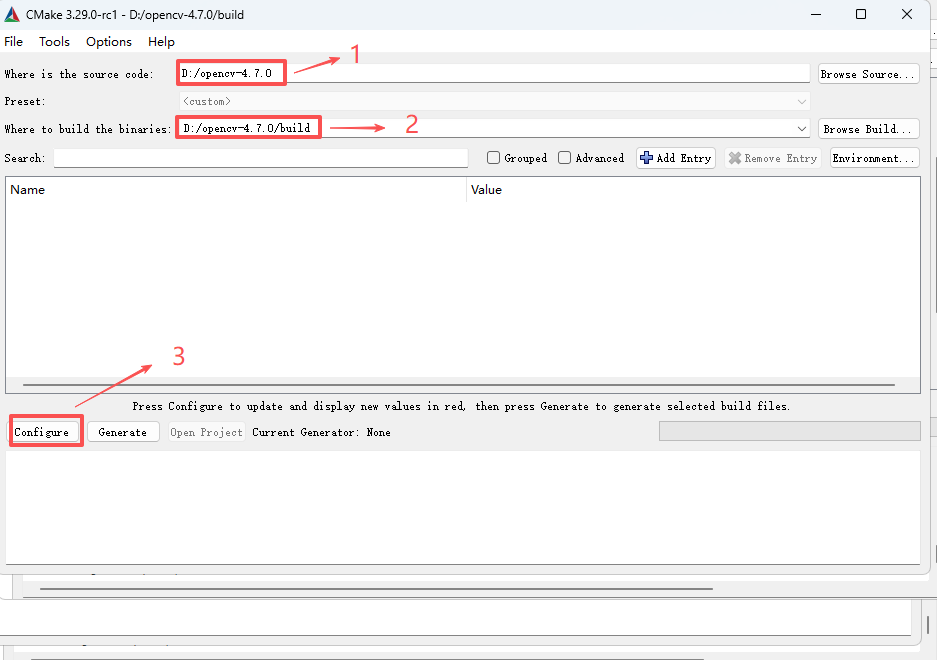
-
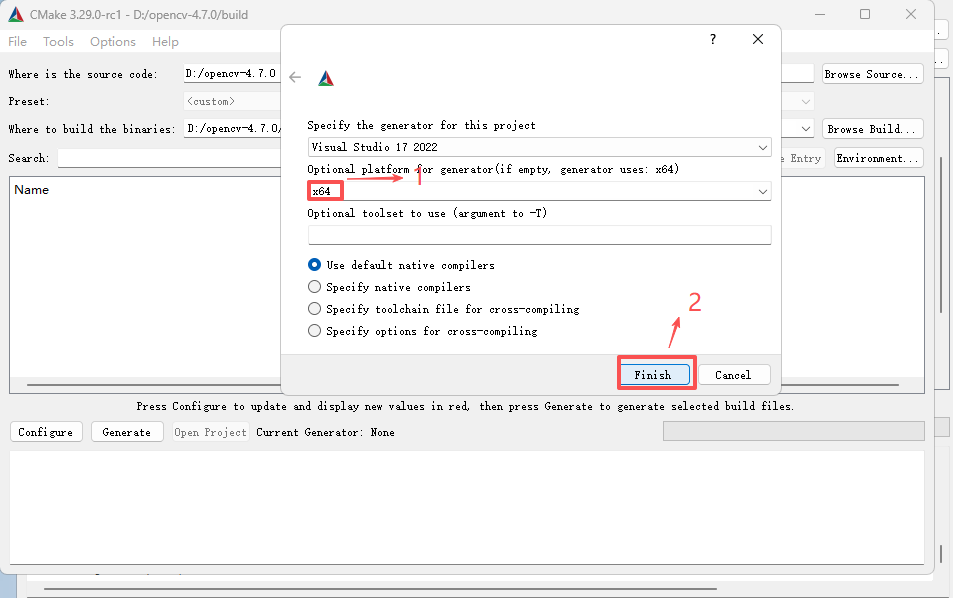
Step 2: Select Target Platform
Choose x64 as the target platform and then click Finish.
-
Step 3: Generate Visual Studio Project
Search for
BUILD_opencv_worldand check it. Click Configure -> Generate -> Open in Project sequentially to enter the Visual Studio 2022 compilation interface.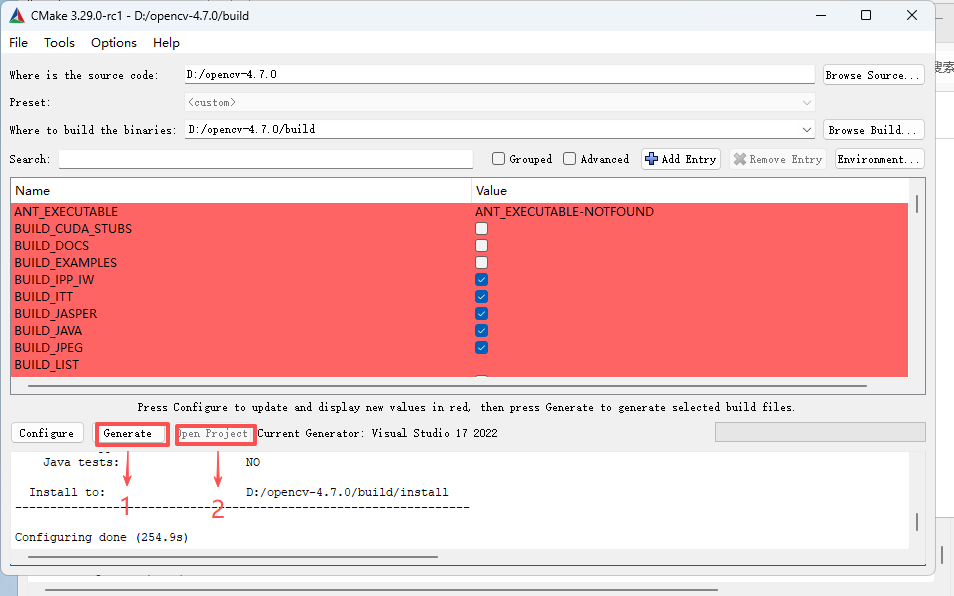
-
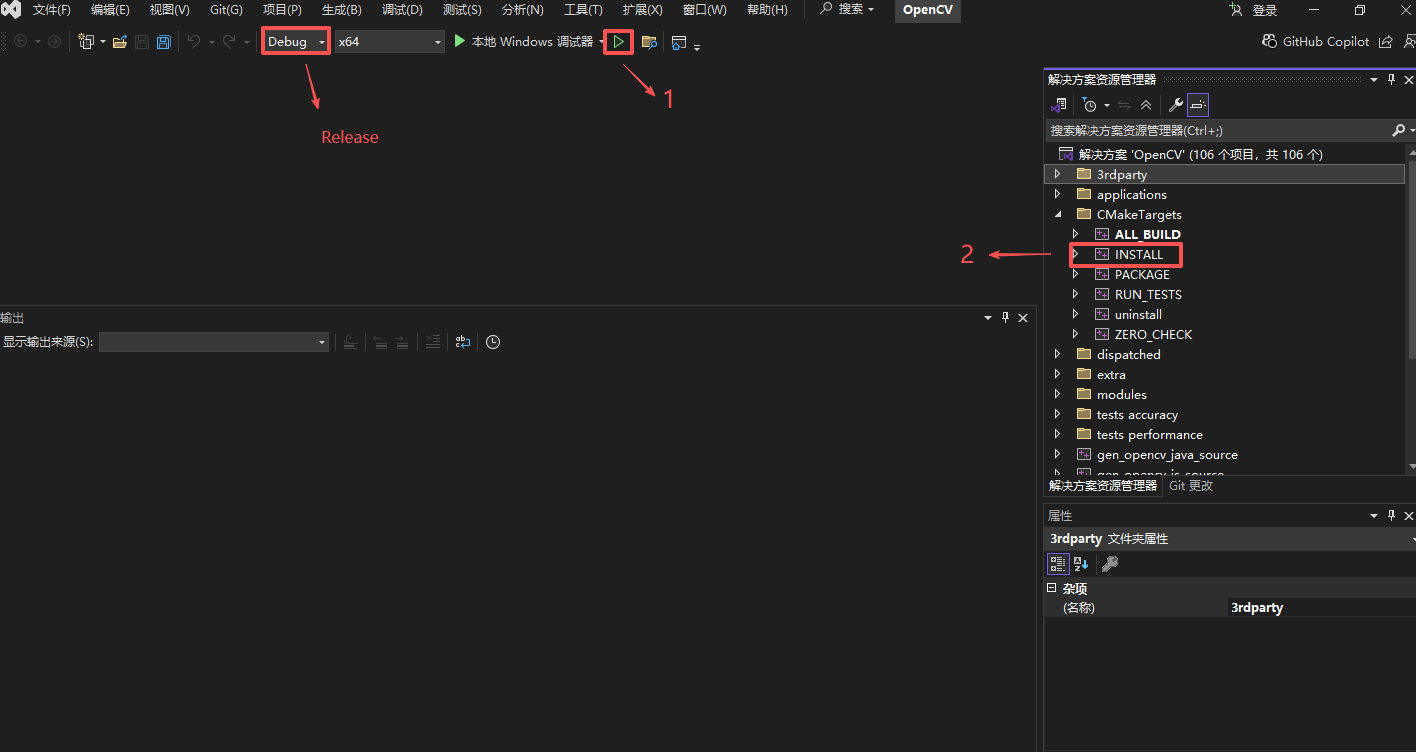
Step 4: Execute Compilation
Click Start Solution Generation. After compilation, click INSTALL to complete the installation.
1.2 Compile Paddle Inference
You can choose to directly download a pre-compiled package or manually compile the source code.
1.2.1 Directly Download Pre-compiled Package (Recommended)
The Paddle Inference Official Website provides Windows prediction libraries. You can view and select the appropriate pre-compiled package on the official website.
After downloading and extracting it, a paddle_inference/ subfolder will be generated in the current folder. The directory structure is as follows:
paddle_inference
├── paddle # Paddle core library and header files
├── third_party # Third-party dependency libraries and header files
└── version.txt # Version and compilation information
1.2.2 Compile Prediction Library from Source Code
You can choose to compile the prediction library from source code. Compiling from source allows flexible configuration of various features and dependencies to adapt to different hardware and software environments. For detailed steps, please refer to Compiling from Source under Windows.
2. Getting Started
2.1 Compile Prediction Demo
Before compiling the prediction demo, please ensure that you have compiled the OpenCV library and Paddle Inference prediction library according to Sections 1.1 and 1.2.
The compilation steps are as follows:
-
Step 1: Build Visual Studio Project
Specify the
deploy\cpp_infersource code path in cmake-gui, and set the compilation output directory todeploy\cpp_infer\build. The following compilation steps will useD:\PaddleOCR\deploy\cpp_inferas an example source code path. It is normal to encounter an error during the first Configure click. In the subsequent compilation options that pop up, add the installation path for OpenCV and the Paddle Inference prediction library path.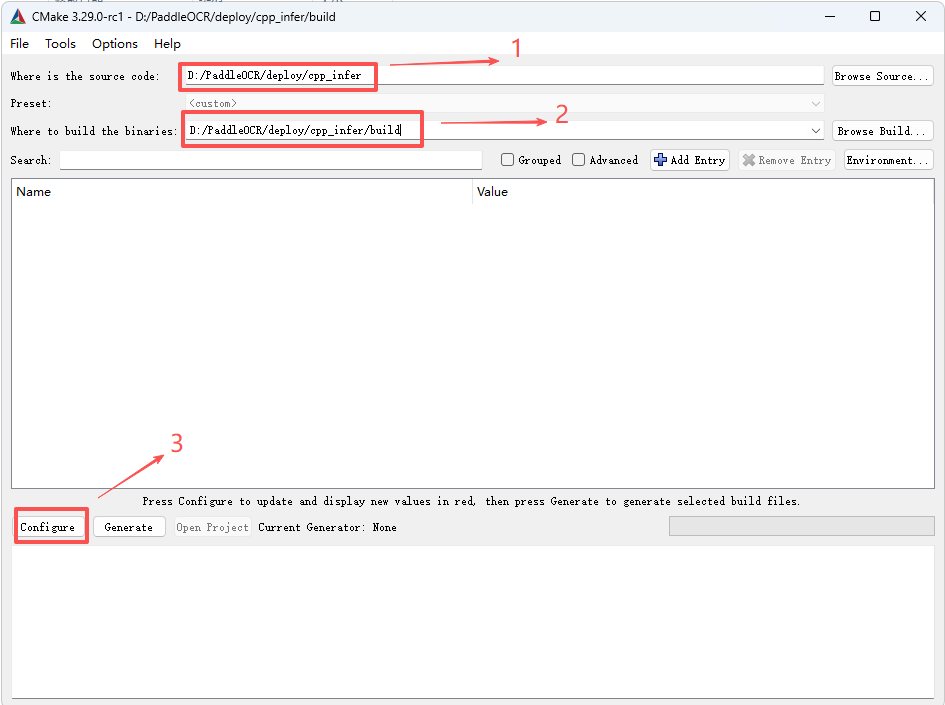 - Step 2: Select the target platform
Select the target platform as x64 and click Finish.
- Step 2: Select the target platform
Select the target platform as x64 and click Finish.
-
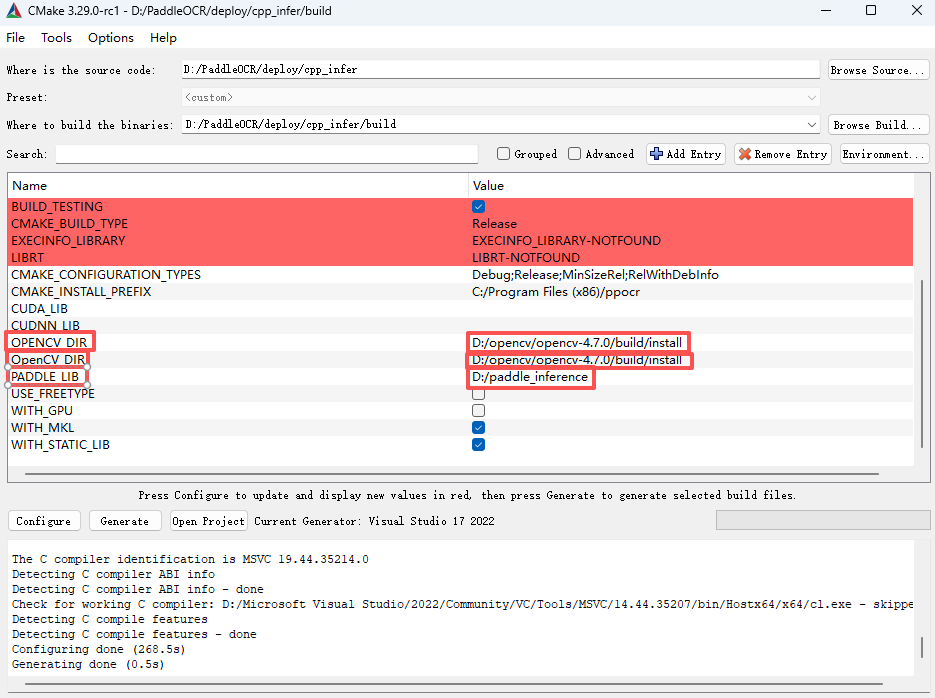
Step 3:Configure CMake build options
- OPENCV_DIR: Specify the installation path of OpenCV.
- OpenCV_DIR: Same as OPENCV_DIR.
- PADDLE_LIB: Path to the Paddle Inference library.
-
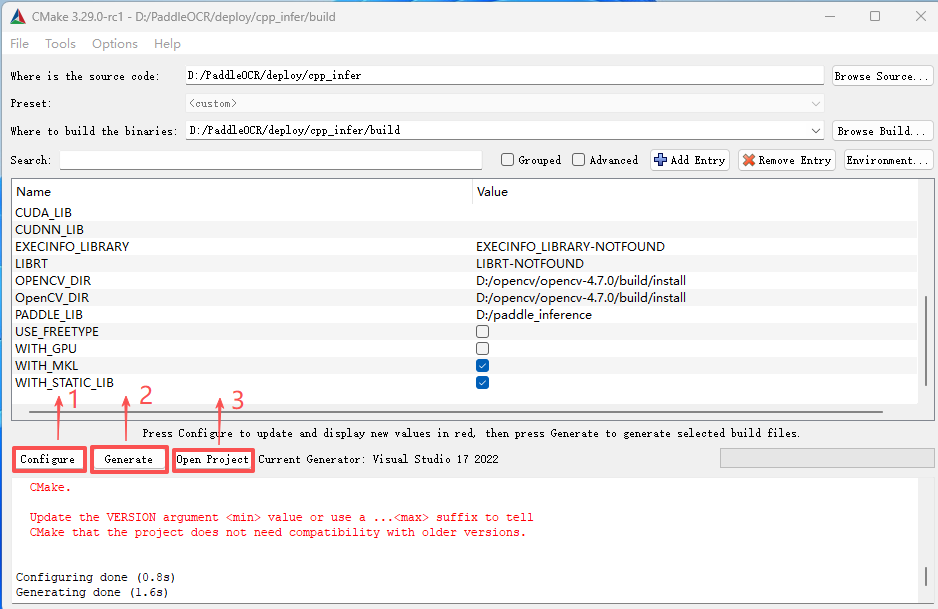
Step 4:Generate Visual Studio project
Click Configure → Generate → Open in Project to open the Visual Studio 2022 compilation interface.
-
Step 5:Compile the code
Before building the solution:
- Change the build configuration from
DebugtoRelease. - Download dirent.h and copy it to the Visual Studio include folder (e.g.,
C:\Program Files (x86)\Microsoft Visual Studio\2022\Community\VC\Auxiliary\VS\include).
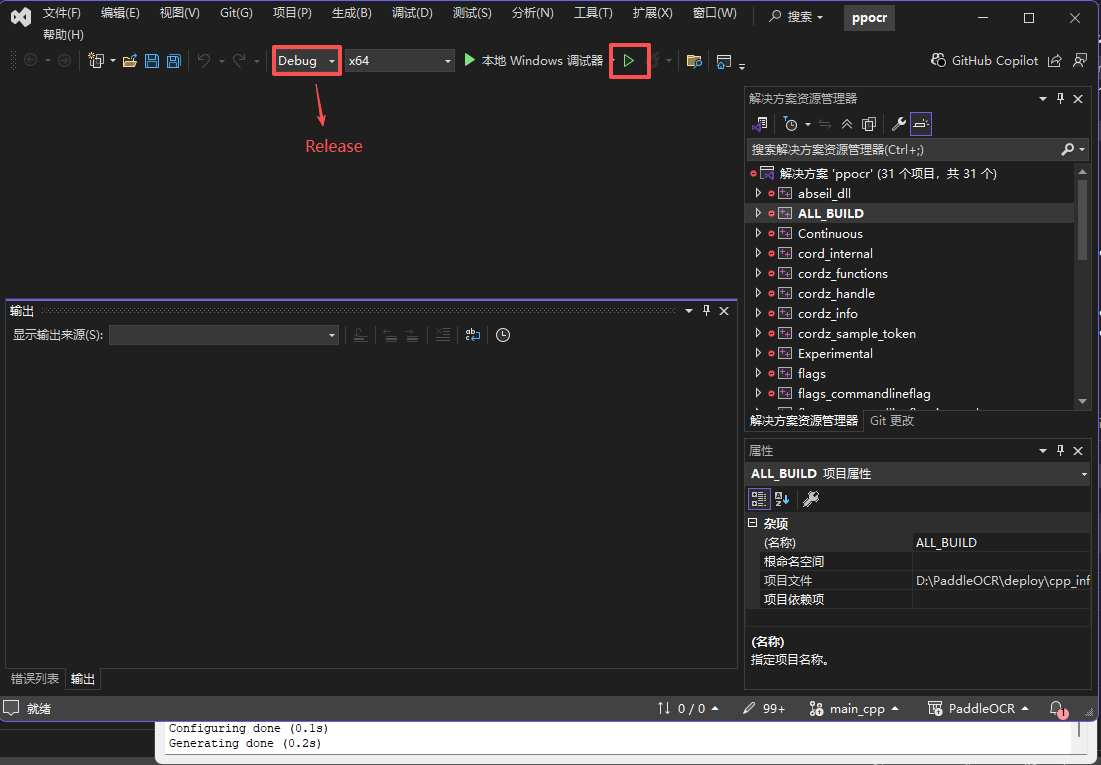
After compilation, the executable file will be located at
deploy/cpp_infer/build/Release/ppocr.exe.
- Change the build configuration from
-
Step 6:Run the prediction demo
Copy the following files to the
deploy\cpp_infer\build\Release\directory, then follow Sections 2.2 and 2.3 to run the demo:paddle_inference\paddle\lib\paddle_inference.dllpaddle_inference\paddle\lib\common.dlldeploy\cpp_infer\build\bin\Release\abseil_dll.dlldeploy\cpp_infer\build\third_party\clipper_ver6.4.2\cpp\Release\polyclipping.dllopencv-4.7.0\build\install\x64\vc16\bin\opencv_world470.dll
2.2 Prepare the Model
Refer to the General OCR Pipeline C++ Deployment - Linux → 2.2 Prepare the Model section.
2.3 Run the Prediction Demo
Refer to the General OCR Pipeline C++ Deployment - Linux → 2.3 Run the Prediction Demo section.
2.4 C++ API Integration
Refer to the General OCR Pipeline C++ Deployment - Linux → 2.4 C++ API Integration section.
3. Extended Features
3.1 Multilingual Text Recognition
Refer to the General OCR Pipeline C++ Deployment - Linux → 3.1 Multilingual Text Recognition section.
3.2 Visualize Text Recognition Results
To visualize text recognition results, you need to compile OpenCV with the FreeType module from the opencv_contrib repository (version 4.x). Ensure the OpenCV and opencv_contrib versions match. Below is an example using opencv-4.7.0 and opencv_contrib-4.7.0:
Download opencv-4.7.0
Download opencv_contrib-4.7.0
-
Step 1:Compile FreeType and HarfBuzz
Add the
bindirectory of the extractedpkg-configto the system PATH.
For FreeType compilation, manually specify the installation path (example below):
Click Configure → Generate, then open the project in Visual Studio to compile.
In VS, buildALL_BUILDandINSTALLto generate the requiredincludeandlibfiles in theinstalldirectory.Add the FreeType installation path to the system environment variables.
For HarfBuzz compilation, manually specify the installation path (example below):

After setting the paths, click Configure again, go to Advanced Options, and specify the FreeType installation path.

Add the HarfBuzz installation path to the system environment variables.- Step 2: Modify
modules/freetype/CMakeLists.txtunder opencv_contrib-4.7.0set(the_description "FreeType module. It enables to draw strings with outlines and mono-bitmaps/gray-bitmaps.") find_package(Freetype REQUIRED) # find_package(HarfBuzz) is not included in cmake set(HARFBUZZ_DIR "$ENV{HARFBUZZ_DIR}" CACHE PATH "HarfBuzz directory") find_path(HARFBUZZ_INCLUDE_DIRS NAMES hb-ft.h PATH_SUFFIXES harfbuzz HINTS ${HARFBUZZ_DIR}/include) find_library(HARFBUZZ_LIBRARIES NAMES harfbuzz HINTS ${HARFBUZZ_DIR}/lib) find_package_handle_standard_args(HARFBUZZ DEFAULT_MSG HARFBUZZ_LIBRARIES HARFBUZZ_INCLUDE_DIRS) if(NOT FREETYPE_FOUND) message(STATUS "freetype2: NO") else() message(STATUS "freetype2: YES") endif() if(NOT HARFBUZZ_FOUND) message(STATUS "harfbuzz: NO") else() message(STATUS "harfbuzz: YES") endif() if(FREETYPE_FOUND AND HARFBUZZ_FOUND) ocv_define_module(freetype opencv_core opencv_imgproc PRIVATE_REQUIRED ${FREETYPE_LIBRARIES} ${HARFBUZZ_LIBRARIES} WRAP python) ocv_include_directories(${FREETYPE_INCLUDE_DIRS} ${HARFBUZZ_INCLUDE_DIRS}) else() ocv_module_disable(freetype) endif() -
Step 3: Compile OpenCV
- Set the
OPENCV_EXTRA_MODULES_PATHitem and fill in the path to themodulesdirectory under the opencv-contrib-4.7.0 directory. - Check the
WITH_FREETYPEitem. Note that you must first compile freetype and harfbuzz. - If you need to support freetype, you need to add the relevant paths of freetype in the CMake configuration of OpenCV.

Search for harfbuzz, add harfbuzz, and add the relevant paths.

After completing the above steps, click Configure again in the CMake interface. After ensuring there are no errors, click Generate, and then click Open Project to open Visual Studio. Switch from Debug to Release, right-click on ALL_BUILD and select Build. After the compilation is completed, right-click on INSTALL and select Build.
Note: If you have compiled OpenCV with FreeType included, when compiling the demo for the General OCR Pipeline in Section 2.1 Step 3, you need to check the
USE_FREETYPEoption to enable text rendering functionality. Additionally, when running the demo, you need to provide the path to the corresponding TTF font file using the--vis_font_dir your_ttf_pathparameter. - Set the
After compiling and running the prediction demo, you can obtain the following visualized text recognition results:
