2024-07-17 16:52:41 -04:00
import FeatureAvailability from '@site/src/components/FeatureAvailability ';
# Configure Slack For Notifications
< FeatureAvailability saasOnly / >
## Install the DataHub Slack App into your Slack workspace
2025-04-16 16:55:51 -07:00
2024-10-28 19:06:21 -04:00
You can see the permissions required by the DataHub Slack bot [below ](#datahub-slack-bot-permissions ).
2024-07-17 16:52:41 -04:00
### Video Walkthrough
2025-04-16 16:55:51 -07:00
2024-07-17 16:52:41 -04:00
< div align = "center" > < iframe width = "560" height = "315" src = "https://www.loom.com/embed/af6fcfd435cf4993b79a0c8e13aecaaa?sid=93f2a66b-1362-4809-996b-5abb399f82dd" frameborder = "0" webkitallowfullscreen mozallowfullscreen allowfullscreen > < / iframe > < / div >
### Step-by-step guide
2025-04-16 16:55:51 -07:00
The following steps should be performed by a Slack Workspace Admin.
2024-07-17 16:52:41 -04:00
1. Navigate to [https://api.slack.com/reference/manifests#config-tokens ](https://api.slack.com/reference/manifests#config-tokens )
2. Under **Managing configuration tokens** , select ** 'Generate Token'**
< p align = "center" >
< img width = "70%" src = "https://raw.githubusercontent.com/datahub-project/static-assets/main/imgs/saas/slack/setup_1.png" / >
< / p >
3. Select your workspace, then hit ** 'Generate'**
< p align = "center" >
< img width = "70%" src = "https://raw.githubusercontent.com/datahub-project/static-assets/main/imgs/saas/slack/setup_2.png" / >
< / p >
2025-04-16 16:55:51 -07:00
4. Now you will see two tokens available for you to copy, an _Access Token_ and a _Refresh Token_
2024-07-17 16:52:41 -04:00
< p align = "center" >
< img width = "70%" src = "https://raw.githubusercontent.com/datahub-project/static-assets/main/imgs/saas/slack/setup_3.png" / >
< / p >
5. Navigate back to your DataHub [Slack Integration setup page ](https://longtailcompanions.acryl.io/settings/integrations/slack ), and paste the tokens into their respective boxes, and click ** 'Connect'**.
< p align = "center" >
< img width = "70%" src = "https://raw.githubusercontent.com/datahub-project/static-assets/main/imgs/saas/slack/setup_4.png" / >
< / p >
2024-10-28 18:27:38 -04:00
6. You will be automatically re-directed to Slack to confirm DataHub Slack App's permissions and complete the installation process.
:::note
You may need approval from a workspace admin to do this step. Learn about [what to do in this scenario here ](#workspace-admin-approval-guide ).
:::
2025-04-16 16:55:51 -07:00
2024-07-17 16:52:41 -04:00
< p align = "center" >
< img width = "70%" src = "https://raw.githubusercontent.com/datahub-project/static-assets/main/imgs/saas/slack/setup_5.png" / >
< / p >
7. Congrats 🎉 Slack is set up! Now try it out by going to the **Platform Notifications** page
< p align = "center" >
< img width = "70%" src = "https://raw.githubusercontent.com/datahub-project/static-assets/main/imgs/saas/slack/setup_6.png" / >
< / p >
8. Enter your channel in, and click ** 'Send a test notification'**
< p align = "center" >
< img width = "70%" src = "https://raw.githubusercontent.com/datahub-project/static-assets/main/imgs/saas/slack/setup_7.png" / >
< / p >
2025-04-28 23:34:33 +09:00
Now proceed to the [Subscriptions and Notifications page ](https://docs.datahub.com/docs/managed-datahub/subscription-and-notification ) to see how you can subscribe to be notified about events on the platform, or visit the [Slack App page ](saas-slack-app.md ) to see how you can use DataHub's powerful capabilities directly within Slack.
2024-07-17 16:52:41 -04:00
2024-10-28 19:06:21 -04:00
### DataHub Slack bot permissions
2025-04-16 16:55:51 -07:00
2024-10-28 19:06:21 -04:00
The DataHub Slack bot requires a certain set of scopes (permissions) to function. We've listed them below with thier explanations.
2025-04-16 16:55:51 -07:00
2024-10-28 19:06:21 -04:00
```
# Required for slash commands / shortcuts.
commands
# Required to get @DataHub messages and send messages as @DataHub.
app_mentions:read
chat:write
chat:write.public
# When sending messages we want to use a custom icon_url so that we can display the DataHub Cloud logo.
chat:write.customize
# Required to see conversation details + read messages.
channels:history
channels:read
groups:history
groups:read
im:history
im:read
mpim:history
mpim:read
metadata.message:read
# Required to get workspace ID and create links to user profiles.
team:read
# Allows the bot to join a public channel when someone configures notifications to be sent to one.
channels:join
# Required to unfurl links.
links:read
links:write
# Required to resolve user IDs to names/emails + enable lookup by email address.
users:read
users:read.email
# Future-proofing.
reactions:read
reactions:write
```
2024-10-28 18:27:38 -04:00
### Workspace admin approval guide
2025-04-16 16:55:51 -07:00
2024-10-28 18:27:38 -04:00
In some workspaces, you will find at step 6 above you will need approval from your workspace admin. In this case, you will want to:
2025-04-16 16:55:51 -07:00
2024-10-28 18:27:38 -04:00
1. On step #6 above, continue by clicking the button to request their approval.
2. Once approved, you will get a notification from the **Slack bot** that your request has been approved. Follow the link it provides to complete the process.
2025-04-16 16:55:51 -07:00
**If you do not get the message:** visit [api.slack.com/apps ](https://api.slack.com/apps ), open your DataHub app and complete the installation from there.
2024-10-28 18:27:38 -04:00
3. Once it is done, you can visit `<your-datahub-instance-url>/settings/notifications` , and send a test notification to verify everything's working.
2025-04-28 23:34:33 +09:00
4. **Making Slack commands work:** when running Slack commands such as `/datahub search my dataset` you may get a `dispatch_failed` error. To resolve this, see [the steps here ](https://docs.datahub.com/docs/managed-datahub/slack/saas-slack-troubleshoot#slack-bot-issues ).
2024-10-28 18:27:38 -04:00
2024-07-17 16:52:41 -04:00
<!-- NOTE: we are hiding this method for now. If a need arises, we can uncomment below docs.
# Bot Token Method (Not recommended)
- Select your workspace
- Paste this Manifest in YAML. Suggest changing name and `display_name` to be `DataHub App YOUR_TEAM_NAME` but not required. This name will show up in your slack workspace
```yml
display_information:
name: DataHub App
description: An app to integrate DataHub with Slack
background_color: "#000000 "
features:
bot_user:
display_name: DataHub App
always_online: false
oauth_config:
scopes:
bot:
- channels:read
- chat:write
- commands
- groups:read
- im:read
- mpim:read
- team:read
- users:read
- users:read.email
settings:
org_deploy_enabled: false
socket_mode_enabled: false
token_rotation_enabled: false
```
Confirm you see the Basic Information Tab
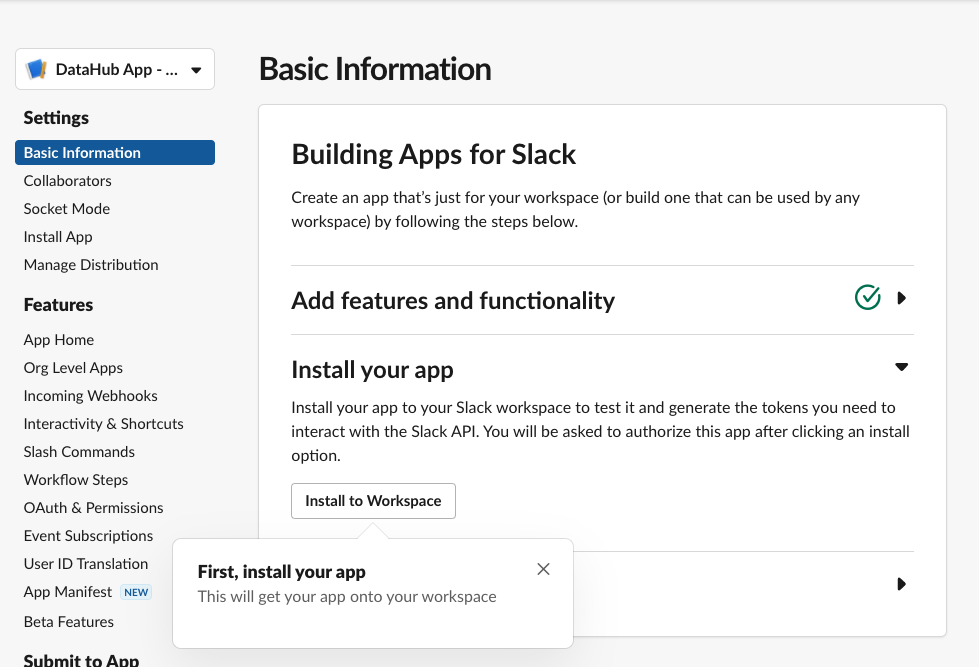
- Click **Install to Workspace**
- It will show you permissions the Slack App is asking for, what they mean and a default channel in which you want to add the slack app
- Note that the Slack App will only be able to post in channels that the app has been added to. This is made clear by slack’
- Select the channel you'd like notifications to go to and click **Allow**
- Go to DataHub App page
- You can find your workspace's list of apps at https://api.slack.com/apps/
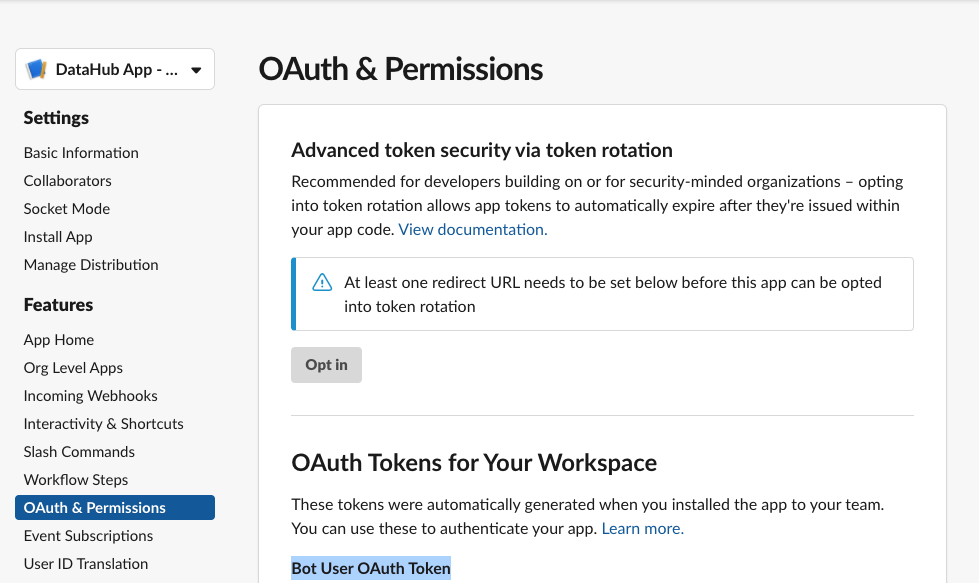
## Generating a Bot Token
- Go to **OAuth & Permissions** Tab
2025-04-16 16:55:51 -07:00
Here you'll find a “Bot User OAuth Token” which DataHub will need to communicate with your slack through the bot.
2024-07-30 09:52:51 +09:00
In the next steps, we'll show you how to configure the Slack Integration inside of DataHub Cloud.
2024-07-17 16:52:41 -04:00
## Configuring Notifications
2025-04-16 16:55:51 -07:00
> In order to set up the Slack integration, the user must have the `Manage Platform Settings` privilege.
2024-07-17 16:52:41 -04:00
To enable the integration with slack
- Navigate to **Settings > Integrations**
- Click **Slack**
2025-04-16 16:55:51 -07:00
- Enable the Integration
2024-07-17 16:52:41 -04:00
- Enter the **Bot Token** obtained in the previous steps
2025-04-16 16:55:51 -07:00
- Enter a **Default Slack Channel** - this is where all notifications will be routed unless
2024-07-17 16:52:41 -04:00
- Click **Update** to save your settings
< img width = "60%" src = "https://raw.githubusercontent.com/datahub-project/static-assets/main/imgs/integrations/slack/slack_add_token.png" / >
To enable and disable specific types of notifications, or configure custom routing for notifications, start by navigating to **Settings > Notifications** .
To enable or disable a specific notification type in Slack, simply click the check mark. By default, all notification types are enabled.
To customize the channel where notifications are send, click the button to the right of the check box.
< img width = "70%" src = "https://raw.githubusercontent.com/datahub-project/static-assets/main/imgs/integrations/slack/slack_channel.png" / >
2025-04-16 16:55:51 -07:00
If provided, a custom channel will be used to route notifications of the given type. If not provided, the default channel will be used.
2024-07-17 16:52:41 -04:00
That's it! You should begin to receive notifications on Slack. Note that it may take up to 1 minute for notification settings to take effect after saving. -->
## Sending Notifications
For now, we support sending notifications to
2025-04-16 16:55:51 -07:00
2024-07-17 16:52:41 -04:00
- Slack Channel Name (e.g. `#troubleshoot` )
- Slack Channel ID (e.g. `C029A3M079U` )
2025-04-16 16:55:51 -07:00
- Specific Users (aka Direct Messages or DMs) via user ID
2024-07-17 16:52:41 -04:00
By default, the Slack app will be able to send notifications to public channels. If you want to send notifications to private channels or DMs, you will need to invite the Slack app to those channels.
## How to find Team ID and Channel ID in Slack
2025-04-16 16:55:51 -07:00
2024-07-17 16:52:41 -04:00
:::note
We recommend just using the Slack channel name for simplicity (e.g. `#troubleshoot` ).
:::
**Via Slack App:**
2025-04-16 16:55:51 -07:00
2024-07-17 16:52:41 -04:00
1. Go to the Slack channel for which you want to get a channel ID
2. Click the channel name at the top
< p align = "center" >
< img width = "70%" src = "https://raw.githubusercontent.com/datahub-project/static-assets/main/imgs/saas/slack/channel_id_1.png" / >
< / p >
3. At the bottom of the modal that pops up, you will see the Channel ID as well as a button to copy it
< p align = "center" >
< img width = "70%" src = "https://raw.githubusercontent.com/datahub-project/static-assets/main/imgs/saas/slack/channel_id_2.png" / >
< / p >
**Via Web:**
2025-04-16 16:55:51 -07:00
2024-07-17 16:52:41 -04:00
1. Go to the Slack channel for which you want to get a channel ID
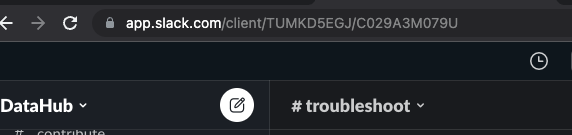
2. Check the URL e.g. for the troubleshoot channel in OSS DataHub Slack
2025-04-16 16:55:51 -07:00
2024-07-17 16:52:41 -04:00
3. Notice `TUMKD5EGJ/C029A3M079U` in the URL
2025-04-16 16:55:51 -07:00
- Team ID = `TUMKD5EGJ` from above
- Channel ID = `C029A3M079U` from above
2024-07-17 16:52:41 -04:00
## How to find User ID in Slack
**Your User ID**
2025-04-16 16:55:51 -07:00
2024-07-17 16:52:41 -04:00
1. Click your profile picture, then select ** 'Profile'**
< p align = "center" >
< img width = "70%" src = "https://raw.githubusercontent.com/datahub-project/static-assets/main/imgs/saas/slack/member_id_1.png" / >
< / p >
2. Now hit the ** '...'** and select ** 'Copy member ID'**
< p align = "center" >
< img width = "70%" src = "https://raw.githubusercontent.com/datahub-project/static-assets/main/imgs/saas/slack/member_id_2.png" / >
< / p >
**Someone else's User ID**
2025-04-16 16:55:51 -07:00
2024-07-17 16:52:41 -04:00
1. Click their profile picture in the Slack message
< p align = "center" >
< img width = "70%" src = "https://raw.githubusercontent.com/datahub-project/static-assets/main/imgs/saas/slack/member_id_3.png" / >
< / p >
2. Now hit the ** '...'** and select ** 'Copy member ID'**
< p align = "center" >
< img width = "70%" src = "https://raw.githubusercontent.com/datahub-project/static-assets/main/imgs/saas/slack/member_id_4.png" / >
< / p >