Extending the Metadata Model
You can extend the metadata model by either creating a new Entity or extending an existing one. Unsure if you need to create a new entity or add an aspect to an existing entity? Read metadata-model to understand these two concepts prior to making changes.
To fork or not to fork?
An important question that will arise once you've decided to extend the metadata model is whether you need to fork the main repo or not. Use the diagram below to understand how to make this decision.
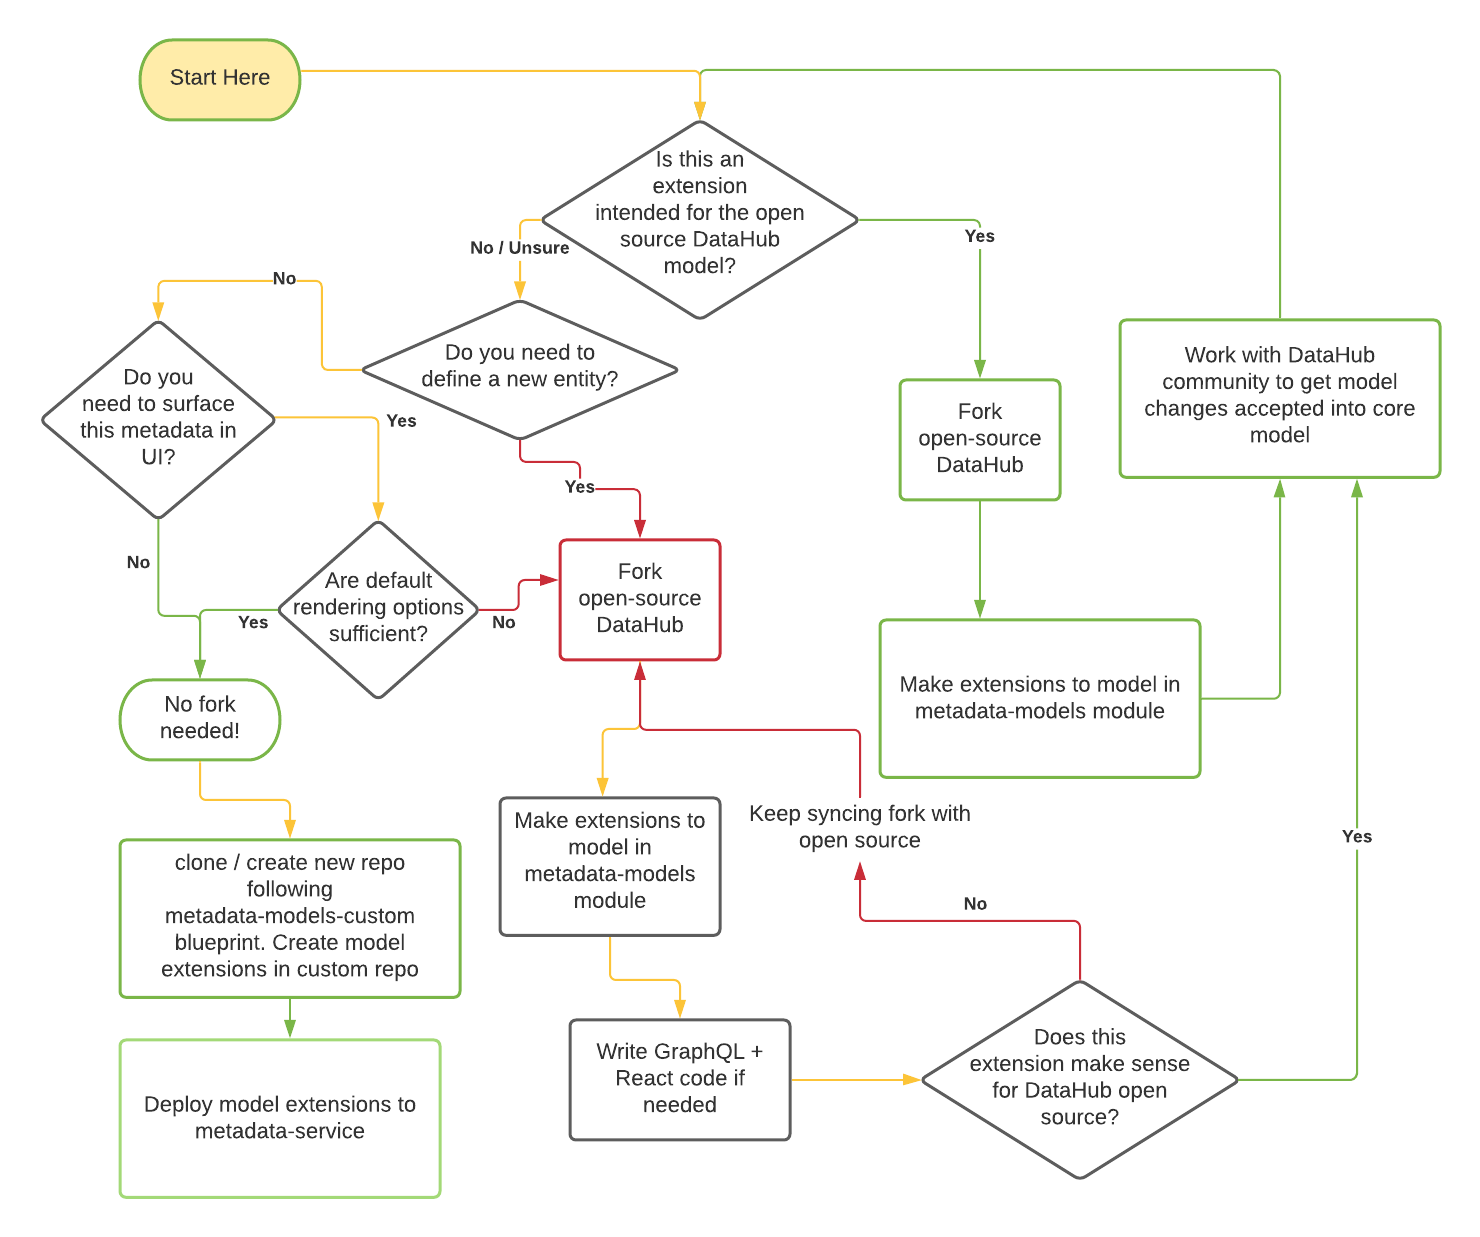
The green lines represent pathways that will lead to lesser friction for you to maintain your code long term. The red lines represent higher risk of conflicts in the future. We are working hard to move the majority of model extension use-cases to no-code / low-code pathways to ensure that you can extend the core metadata model without having to maintain a custom fork of DataHub.
We will refer to the two options as the open-source fork and custom repository approaches in the rest of the document below.
This Guide
This guide will outline what the experience of adding a new Entity should look like through a real example of adding the Dashboard Entity. If you want to extend an existing Entity, you can skip directly to Step 3.
At a high level, an entity is made up of:
- A Key Aspect: Uniquely identifies an instance of an entity,
- A list of specified Aspects, groups of related attributes that are attached to an entity.
Defining an Entity
Now we'll walk through the steps required to create, ingest, and view your extensions to the metadata model. We will use the existing "Dashboard" entity for purposes of illustration.
Step 1: Define the Entity Key Aspect
A key represents the fields that uniquely identify the entity. For those familiar with DataHub’s legacy architecture, these fields were previously part of the Urn Java Class that was defined for each entity.
This struct will be used to generate a serialized string key, represented by an Urn. Each field in the key struct will be converted into a single part of the Urn's tuple, in the order they are defined.
Let’s define a Key aspect for our new Dashboard entity.
namespace com.linkedin.metadata.key

/**
 * Key for a Dashboard
 */
@Aspect = {
  "name": "dashboardKey",
}
record DashboardKey {
  /**
  * The name of the dashboard tool such as looker, redash etc.
  */
  @Searchable = {
    ...
  }
  dashboardTool: string

  /**
  * Unique id for the dashboard. This id should be globally unique for a dashboarding tool even when there are multiple deployments of it. As an example, dashboard URL could be used here for Looker such as 'looker.linkedin.com/dashboards/1234'
  */
  dashboardId: string
}
The Urn representation of the Key shown above would be:
urn:li:dashboard:(<tool>,<id>)
Because they are aspects, keys need to be annotated with an @Aspect annotation, This instructs DataHub that this struct can be a part of.
The key can also be annotated with the two index annotations: @Relationship and @Searchable. This instructs DataHub infra to use the fields in the key to create relationships and index fields for search. See Step 3 for more details on the annotation model.
Constraints: Note that each field in a Key Aspect MUST be of String or Enum type.
Step 2: Create the new entity with its key aspect
Define the entity within an entity-registry.yml file. Depending on your approach, the location of this file may vary. More on that in steps 4 and 5.
Example:
- name: dashboard
  doc: A container of related data assets.
  keyAspect: dashboardKey
- name: The entity name/type, this will be present as a part of the Urn.
- doc: A brief description of the entity.
- keyAspect: The name of the Key Aspect defined in step 1. This name must match the value in the PDL annotation.
Step 3: Define custom aspects or attach existing aspects to your entity
Some aspects, like Ownership and GlobalTags, are reusable across entities. They can be included in an entity’s set of aspects freely. To include attributes that are not included in an existing Aspect, a new Aspect must be created.
Let’s look at the DashboardInfo aspect as an example of what goes into a new aspect.
namespace com.linkedin.dashboard

import com.linkedin.common.AccessLevel
import com.linkedin.common.ChangeAuditStamps
import com.linkedin.common.ChartUrn
import com.linkedin.common.Time
import com.linkedin.common.Url
import com.linkedin.common.CustomProperties
import com.linkedin.common.ExternalReference

/**
 * Information about a dashboard
 */
@Aspect = {
  "name": "dashboardInfo"
}
record DashboardInfo includes CustomProperties, ExternalReference {

  /**
   * Title of the dashboard
   */
  @Searchable = {
    "fieldType": "TEXT_WITH_PARTIAL_MATCHING",
    "queryByDefault": true,
    "enableAutocomplete": true,
    "boostScore": 10.0
  }
  title: string

  /**
   * Detailed description about the dashboard
   */
  @Searchable = {
    "fieldType": "TEXT",
    "queryByDefault": true,
    "hasValuesFieldName": "hasDescription"
  }
  description: string

  /**
   * Charts in a dashboard
   */
  @Relationship = {
    "/*": {
      "name": "Contains",
      "entityTypes": [ "chart" ]
    }
  }
  charts: array[ChartUrn] = [ ]

  /**
   * Captures information about who created/last modified/deleted this dashboard and when
   */
  lastModified: ChangeAuditStamps

  /**
   * URL for the dashboard. This could be used as an external link on DataHub to allow users access/view the dashboard
   */
  dashboardUrl: optional Url

  /**
   * Access level for the dashboard
   */
  @Searchable = {
    "fieldType": "KEYWORD",
    "addToFilters": true
  }
  access: optional AccessLevel

  /**
   * The time when this dashboard last refreshed
   */
  lastRefreshed: optional Time
}
The Aspect has four key components: its properties, the @Aspect annotation, the @Searchable annotation and the @Relationship annotation. Let’s break down each of these:
- Aspect properties: The record’s properties can be declared as a field on the record, or by including another
record in the Aspect’s definition (
record DashboardInfo includes CustomProperties, ExternalReference {). Properties can be defined as PDL primitives, enums, records, or collections ( see pdl schema documentation) references to other entities, of type Urn or optionally<Entity>Urn - @Aspect annotation: Declares record is an Aspect and includes it when serializing an entity. Unlike the following two annotations, @Aspect is applied to the entire record, rather than a specific field. Note, you can mark an aspect as a timeseries aspect. Check out this doc for details.
- @Searchable annotation: This annotation can be applied to any primitive field or a map field to indicate that it should be indexed in Elasticsearch and can be searched on. For a complete guide on using the search annotation, see the annotation docs further down in this document.
- @Relationship annotation: These annotations create edges between the Entity’s Urn and the destination of the
annotated field when the entities are ingested. @Relationship annotations must be applied to fields of type Urn. In
the case of DashboardInfo, the
chartsfield is an Array of Urns. The @Relationship annotation cannot be applied directly to an array of Urns. That’s why you see the use of an Annotation override ("/*":) to apply the @Relationship annotation to the Urn directly. Read more about overrides in the annotation docs further down on this page. - @UrnValidation: This annotation can enforce constraints on Urn fields, including entity type restrictions and existence.
After you create your Aspect, you need to attach to all the entities that it applies to.
Constraints: Note that all aspects MUST be of type Record.
Step 4: Choose a place to store your model extension
At the beginning of this document, we walked you through a flow-chart that should help you decide whether you need to maintain a fork of the open source DataHub repo for your model extensions, or whether you can just use a model extension repository that can stay independent of the DataHub repo. Depending on what path you took, the place you store your aspect model files (the .pdl files) and the entity-registry files (the yaml file called entity-registry.yaml or entity-registry.yml) will vary.
- Open source Fork: Aspect files go under
metadata-modelsmodule in the main repo, entity registry goes intometadata-models/src/main/resources/entity-registry.yml. Read on for more details in Step 5. - Custom repository: Read the metadata-models-custom documentation to learn how to store and version your aspect models and registry.
Step 5: Attaching your non-key Aspect(s) to the Entity
Attaching non-key aspects to an entity can be done simply by adding them to the entity registry yaml file. The location of this file differs based on whether you are following the oss-fork path or the custom-repository path.
Here is an minimal example of adding our new DashboardInfo aspect to the Dashboard entity.
entities:
   - name: dashboard
   - keyAspect: dashBoardKey
   aspects:
     # the name of the aspect must be the same as that on the @Aspect annotation on the class
     - dashboardInfo
Previously, you were required to add all aspects for the entity into an Aspect union. You will see examples of this pattern throughout the code-base (e.g. DatasetAspect, DashboardAspect etc.). This is no longer required.
Step 6 (Oss-Fork approach): Re-build DataHub to have access to your new or updated entity
If you opted for the open-source fork approach, where you are editing models in the metadata-models repository of DataHub, you will need to re-build the DataHub metadata service using the steps below. If you are following the custom model repository approach, you just need to build your custom model repository and deploy it to a running metadata service instance to read and write metadata using your new model extensions.
Read on to understand how to re-build DataHub for the oss-fork option.
NOTE: If you have updated any existing types or see an Incompatible changes warning when building, you will need to run
./gradlew :metadata-service:restli-servlet-impl:build -Prest.model.compatibility=ignore
before running build.
Then, run ./gradlew build from the repository root to rebuild Datahub with access to your new entity.
Then, re-deploy metadata-service (gms), and mae-consumer and mce-consumer (optionally if you are running them unbundled). See docker development for details on how to deploy during development. This will allow Datahub to read and write your new entity or extensions to existing entities, along with serving search and graph queries for that entity type.
(Optional) Step 7: Use custom models with the Python SDK
- Local CLI
- Custom Models Package
If you're purely using the custom models locally, you can use a local development-mode install of the DataHub CLI.
Install the DataHub CLI locally by following the developer instructions.
The ./gradlew build command already generated the avro schemas for your local ingestion cli tool to use.
After following the developing guide, you should be able to emit your new event using the local DataHub CLI.
If you want to use your custom models beyond your local machine without forking DataHub, then you can generate a custom model package that can be installed from other places.
This package should be installed alongside the base acryl-datahub package, and its metadata models will take precedence over the default ones.
$ cd metadata-ingestion
$ ../gradlew customPackageGenerate -Ppackage_name=my-company-datahub-models -Ppackage_version="0.0.1"
<bunch of log lines>
Successfully built my-company-datahub-models-0.0.1.tar.gz and acryl_datahub_cloud-0.0.1-py3-none-any.whl

Generated package at custom-package/my-company-datahub-models
This package should be installed alongside the main acryl-datahub package.

Install the custom package locally with `pip install custom-package/my-company-datahub-models`
To enable others to use it, share the file at custom-package/my-company-datahub-models/dist/<wheel file>.whl and have them install it with `pip install <wheel file>.whl`
Alternatively, publish it to PyPI with `twine upload custom-package/my-company-datahub-models/dist/*`
This will generate some Python build artifacts, which you can distribute within your team or publish to PyPI. The command output contains additional details and exact CLI commands you can use.
Once this package is installed, you can use the DataHub CLI as normal, and it will use your custom models. You'll also be able to import those models, with IDE support, by changing your imports.
- from datahub.metadata.schema_classes import DatasetPropertiesClass
+ from my_company_datahub_models.metadata.schema_classes import DatasetPropertiesClass
(Optional) Step 8: Extend the DataHub frontend to view your entity in GraphQL & React
If you are extending an entity with additional aspects, and you can use the auto-render specifications to automatically render these aspects to your satisfaction, you do not need to write any custom code.
However, if you want to write specific code to render your model extensions, or if you introduced a whole new entity and want to give it its own page, you will need to write custom React and Grapqhl code to view and mutate your entity in GraphQL or React. For instructions on how to start extending the GraphQL graph, see graphql docs. Once you’ve done that, you can follow the guide here to add your entity into the React UI.
Metadata Annotations
There are four core annotations that DataHub recognizes:
@Entity
Legacy This annotation is applied to each Entity Snapshot record, such as DashboardSnapshot.pdl. Each one that is included in the root Snapshot.pdl model must have this annotation.
It takes the following parameters:
- name: string - A common name used to identify the entity. Must be unique among all entities DataHub is aware of.
Example
@Entity = {
  // name used when referring to the entity in APIs.
  String name;
}
@Aspect
This annotation is applied to each Aspect record, such as DashboardInfo.pdl. Each aspect that is included in an entity’s
set of aspects in the entity-registry.yml must have this annotation.
It takes the following parameters:
- name: string - A common name used to identify the Aspect. Must be unique among all aspects DataHub is aware of.
- type: string (optional) - set to "timeseries" to mark this aspect as timeseries. Check out this doc for details.
- autoRender: boolean (optional) - defaults to false. When set to true, the aspect will automatically be displayed on entity pages in a tab using a default renderer. This is currently only supported for Charts, Dashboards, DataFlows, DataJobs, Datasets, Domains, and GlossaryTerms.
- renderSpec: RenderSpec (optional) - config for autoRender aspects that controls how they are displayed. This is currently only supported for Charts, Dashboards, DataFlows, DataJobs, Datasets, Domains, and GlossaryTerms. Contains three fields:
- displayType: One of
tabular,properties. Tabular should be used for a list of data elements, properties for a single data bag. - displayName: How the aspect should be referred to in the UI. Determines the name of the tab on the entity page.
- key: For
tabularaspects only. Specifies the key in which the array to render may be found.
- displayType: One of
Example
@Aspect = {
  // name used when referring to the aspect in APIs.
  String name;
}
@Searchable
This annotation is applied to fields inside an Aspect. It instructs DataHub to index the field so it can be retrieved via the search APIs.
It takes the following parameters:
fieldType: string - The settings for how each field is indexed is defined by the field type. In general this defines how the field is indexed in the Elasticsearch document. Note: With the new search tier system,
fieldTypeprimarily determines the field's storage format and individual query capabilities. Fulltext search capabilities are now primarily handled by the common_search.tier_{tier}fields that consolidate fields from multiple aspects based on their tier assignments.Available field types:
KEYWORD - Short text fields that only support exact matches, often used only for filtering. Default length limit: 100 characters (tier fields), 255 characters (regular fields).
TEXT - Text fields delimited by spaces/slashes/periods. Default field type for string variables. Default length limit: 100 characters (tier fields), 255 characters (regular fields).
BOOLEAN - Boolean fields used for filtering.
COUNT - Count fields used for filtering.
DATETIME - Datetime fields used to represent timestamps.
OBJECT - Each property in an object will become an extra column in Elasticsearch and can be referenced as
field.propertyin queries. Default limits: Maximum 1000 object keys, maximum 4096 characters per value. You should be careful to not use it on objects with many properties as it can cause a mapping explosion in Elasticsearch.DOUBLE - Double precision numeric fields used for filtering and calculations.
MAP_ARRAY - Array fields that are stored as maps in Elasticsearch. Default limits: Maximum 1000 array elements, maximum 4096 characters per value.
⚠️ Deprecated field types (avoid using in new code):
TEXT_PARTIAL- DEPRECATED: Text fields with partial matching support. This field type is expensive and should not be applied to fields with long values. Use TEXT instead.WORD_GRAM- DEPRECATED: Text fields with word gram support. This field type is expensive and should not be applied to fields with long values. Use TEXT instead.BROWSE_PATH- DEPRECATED: Field type for browse paths. Browse paths are handled by name, usebrowsePathV2field name. There can only be one for a given entity.URN- DEPRECATED: Urn fields where each sub-component is indexed. Use KEYWORD instead.URN_PARTIAL- DEPRECATED: Urn fields with partial matching support. Use KEYWORD instead.
⚠️ Important Length Limitations:
- Tier Fields: Fields with
searchTierare automatically limited to 100 characters to optimize search performance - Regular Fields: Fields without
searchTierare limited to 255 characters for Elasticsearch compatibility - Object Fields: Maximum 1000 object keys and 4096 characters per value to prevent mapping explosion
- Array Fields: Maximum 1000 array elements and 4096 characters per value
- Field Names: Maximum 255 characters for Elasticsearch field name compatibility
Configuration Overrides:
- Environment Variables: Some limits can be configured via environment variables:
SEARCH_DOCUMENT_MAX_VALUE_LENGTH: Override default 4096 character limit for object/array valuesSEARCH_DOCUMENT_MAX_ARRAY_LENGTH: Override default 1000 element limit for arraysSEARCH_DOCUMENT_MAX_OBJECT_KEYS: Override default 1000 key limit for objects
- Special Fields: Some system fields have different limits:
- URN fields: Automatically set to 512 characters (
ignore_above: 512) - Tier fields: Hard-coded to 100 characters for performance optimization
- URN fields: Automatically set to 512 characters (
Note: The ignore_above settings are automatically applied by the system. While some limits can be configured via environment variables, the tier field limits (100 characters) and regular field limits (255 characters) are hard-coded and cannot be overridden through annotations or configuration.
Important: The ability to have longer keyword fields is limited to system-level configurations and special field types. Regular user-defined fields will always be subject to the default limits for performance and compatibility reasons.
fieldName: string (optional) - The name of the field in search index document. Defaults to the field name where the annotation resides.
queryByDefault: boolean (optional) - ⚠️ DEPRECATED: Whether we should match the field for the default search query. True by default for text and urn fields. Use
searchTierinstead for better search organization and performance.enableAutocomplete: boolean (optional) - ⚠️ DEPRECATED: Whether we should use the field for autocomplete. Defaults to false. Use
searchTier: 1based on the fact that an autocomplete field would be very important for search relevance.addToFilters: boolean (optional) - Whether or not to add field to filters. Defaults to false
addHasValuesToFilters: boolean (optional) - Whether or not to add the "has values" to filters. Defaults to true
filterNameOverride: string (optional) - Display name for the filter in the UI
hasValuesFilterNameOverride: string (optional) - Display name for the "has values" filter in the UI
boostScore: double (optional) - ⚠️ DEPRECATED: Boost multiplier to the match score. Matches on fields with higher boost score ranks higher. Use
searchLabelinstead for more sophisticated ranking control.hasValuesFieldName: string (optional) - If set, add an index field of the given name that checks whether the field exists
numValuesFieldName: string (optional) - If set, add an index field of the given name that checks the number of elements
weightsPerFieldValue: map[object, double] (optional) - ⚠️ DEPRECATED: Weights to apply to score for a given value. Use
searchLabelwith@SearchScoreannotations instead for value-based scoring.fieldNameAliases: array[string] (optional) - Aliases for this field that can be used for sorting and other operations. These aliases are created with the aspect name prefix (e.g.,
metadata.aliasName) and provide alternative names for accessing the same field data. Useful for creating multiple access paths to the same field.includeSystemModifiedAt: boolean (optional) - ⚠️ DEPRECATED: Whether to include a system-modified timestamp field for this searchable field. This will be handled programmatically for all aspects in future versions.
systemModifiedAtFieldName: string (optional) - ⚠️ DEPRECATED: Custom name for the system-modified timestamp field. This will be handled programmatically for all aspects in future versions.
includeQueryEmptyAggregation: boolean (optional) - Whether to create a missing field aggregation when querying the corresponding field. Only affects query time, not mapping. Useful for analytics and reporting.
searchTier: integer (optional) - Search tier for the field (integer value >= 1). Creates a copyto field that copies the field value to `_search.tier{tier}
. Fields with searchTier are automatically set toindex: falseunlesssearchIndexed` is true. Note: searchTier can only be used with KEYWORD or TEXT field types.searchLabel: string (optional) - Unified label for search operations. Creates a copy*to field that copies the field value to
\_search.{label}(without prefixes). Replaces the previoussortLabelandboostLabelannotations. Fields with searchLabel are automatically set toindex: false.searchIndexed: boolean (optional) - When combined with
searchTier, determines whether the field is indexed outside of_searchfor direct access. The field will be indexed using its actual field type (KEYWORD or TEXT), not forced to KEYWORD. Note: searchIndexed can only be true when searchTier is specified and can only be used with KEYWORD or TEXT field types. Defaults to false.entityFieldName: string (optional) - If set, this field will be copied to
_search.{entityFieldName}and the root alias will point there. This allows multiple aspects to consolidate into a single entity-level field.eagerGlobalOrdinals: boolean (optional) - Whether to set
eager_global_ordinalsto true for this field. This improves aggregation performance for frequently aggregated keyword fields by pre-building ordinals at index time. Note: eagerGlobalOrdinals can only be true for KEYWORD, URN, or URN_PARTIAL field types. Defaults to false.
⚠️ Note on deprecated parameters: Some parameters like queryByDefault, enableAutocomplete, boostScore, and weightsPerFieldValue are still functional when using search version 2 but will be replaced by newer features in future versions. Consider using the new tier-based and label-based annotations for more advanced search functionality.
Migration from deprecated parameters:
queryByDefault→ UsesearchTier: 1throughsearchTier: 4to include fields in default search queriesenableAutocomplete→ UsesearchTier: 1boostScore→ UsesearchLabelfor more sophisticated ranking controlweightsPerFieldValue→ UsesearchLabelfor value-based scoring control
Example
Let’s take a look at a real world example using the title field of DashboardInfo.pdl:
record DashboardInfo {
 /**
   * Title of the dashboard
   */
  @Searchable = {
    "fieldType": "KEYWORD",
    "searchTier": 1,
    "entityFieldName": "name"
  }
  title: string
  ....
}
This annotation is saying that we want to index the title field in Elasticsearch. searchTier: 1 ensures this field is included in default search queries with high relevancy. entityFieldName: "name" consolidates this field into the entity-level _search.name field, allowing other aspects to contribute to the same consolidated field.
Advanced Example with New Features:
record DashboardInfo {
  /**
   * Priority level for the dashboard
   */
  @Searchable = {
    "fieldType": "COUNT",
    "searchLabel": "priority",
    "addToFilters": true
  }
  priority: int

  /**
   * Status of the dashboard
   */
  @Searchable = {
    "fieldType": "KEYWORD",
    "addToFilters": true,
    "filterNameOverride": "Dashboard Status",
    "eagerGlobalOrdinals": true
  }
  status: string

  /**
   * Owner URN for the dashboard
   */
  @Searchable = {
    "fieldType": "URN",
    "addToFilters": true,
    "eagerGlobalOrdinals": true,
    "searchLabel": "owner"
  }
  owner: string
}
This example demonstrates several new features:
- Priority field:
fieldType: "COUNT"withsearchLabel: "priority"creates a numeric field that copies to_search.priorityfor proper numeric sorting operations, andaddToFilters: truemakes it available as a filter - Status field:
addToFilters: truemakes it available as a filter,filterNameOverrideprovides a custom display name "Dashboard Status", andeagerGlobalOrdinals: trueoptimizes aggregation performance for this frequently filtered field - Owner field:
fieldType: "URN"witheagerGlobalOrdinals: trueoptimizes aggregation performance for owner-based filtering, andsearchLabel: "owner"copies the field to_search.ownerfor ranking operations
Now, when Datahub ingests Dashboards, it will index the priority and status fields in Elasticsearch. The priority field will be available for sorting operations, and both fields will be available as filters in the UI.
Note, when @Searchable annotation is applied to a map, it will convert it into a list with "key.toString()
=value.toString()" as elements. This allows us to index map fields, while not increasing the number of columns indexed.
This way, the keys can be queried by aMapField:key1=value1.
You can change this behavior by specifying the fieldType as OBJECT in the @Searchable annotation. It will put each key
into a column in Elasticsearch instead of an array of serialized kay-value pairs. This way the query would look more
like aMapField.key1:value1. As this method will increase the number of columns with each unique key - large maps can
cause a mapping explosion in Elasticsearch. You should not use the object fieldType if you expect your maps to get
large.
@SearchScore ⚠️ DEPRECATED
⚠️ DEPRECATED: This annotation is deprecated and should not be used in new code. Use searchLabel with the new search tier system instead for ranking functionality.
Search Tier and Label System
The new search tier and label system provides a powerful way to organize search fields and create specialized search experiences:
Search Tiers (searchTier):
- Fields with
searchTierare automatically copied to_search.tier_{tier}fields - This creates a fundamental change in search architecture: fulltext search capabilities are now determined by the tier, not the individual field type
- All fields assigned to the same tier (e.g.,
_search.tier_1) are consolidated into a single searchable field, regardless of their individualfieldType - This allows you to create tiered search experiences where different fields contribute to different search priorities
- Use
searchIndexed: trueif you need direct access to the field for filtering/sorting while maintaining tier functionality
Search Labels (searchLabel):
- Fields with
searchLabelare copied to_search.{label}fields (without prefixes) - Replaces the previous
sortLabelandboostLabelannotations for a unified approach - Useful for creating specialized search, sorting, and ranking operations across multiple aspects
- Automatically sets
index: falseto optimize storage
Entity Field Consolidation (entityFieldName):
- Allows multiple aspects to consolidate into a single entity-level field
- Useful for creating unified search experiences across different aspect types
- Fields are copied to
_search.{entityFieldName}with root-level aliases
Benefits of the New System:
- Organized Search Fields: All search-related fields are grouped under
_search.* - Efficient Indexing: Original fields are not indexed (index: false) but copied to search fields
- Easy Access: Aliases provide convenient access to fields at the root level
- Flexible Querying: Search queries can target specific tier, sort, or ranking fields
- Performance: Optimized storage and query patterns for complex search scenarios
Architectural Impact:
- Before: Each field's
fieldTypedetermined its individual search capabilities and analyzers - After: The
searchTierdetermines fulltext search capabilities, whilefieldTypeprimarily affects storage format and individual field queries - Search Consolidation: Fields from different aspects with the same tier are automatically consolidated into unified search fields
- Simplified Search Logic: Search queries can target entire tiers rather than individual fields, making complex search scenarios more manageable
Migration Guide for Deprecated Features
If you're currently using deprecated field types or parameters, here's how to migrate to the new system:
Field Type Migrations:
| Deprecated | Recommended Replacement | Notes |
|---|---|---|
TEXT_PARTIAL | TEXT | Use TEXT with appropriate analyzers for partial matching |
WORD_GRAM | TEXT | Use TEXT with word delimited analyzers for word-based search |
BROWSE_PATH | BROWSE_PATH_V2 | Use BROWSE_PATH_V2 for improved path hierarchy support |
URN | TEXT | Use TEXT with URN analyzers for component-based search |
URN_PARTIAL | TEXT | Use TEXT with URN analyzers and partial matching |
Parameter Migrations:
| Deprecated Pattern | New Pattern | Benefits |
|---|---|---|
queryByDefault: true | searchTier: 1 | More explicit control over search behavior and better performance |
enableAutocomplete: true | searchTier: 1 | Better performance and organization |
includeSystemModifiedAt: true | Automatic | System modification tracking is now handled automatically for all aspects |
systemModifiedAtFieldName: "customName" | Automatic | System modification field names are now standardized automatically |
Example Migration:
// Old deprecated approach
@Searchable = {
  "fieldType": "TEXT_PARTIAL",
  "queryByDefault": true,
  "enableAutocomplete": true,
  "boostScore": 10.0
}
title: string

// New recommended approach
@Searchable = {
  "fieldType": "TEXT",
  "searchTier": 1,
  "entityFieldName": "name"
}
title: string
Tier Consolidation Example:
// Multiple aspects can now contribute to the same search tier
record DatasetInfo {
  @Searchable = {
    "fieldType": "KEYWORD",
    "searchTier": 1,
    "entityFieldName": "name"
  }
  name: string

  @Searchable = {
    "fieldType": "TEXT",
    "searchTier": 1,
    "entityFieldName": "description"
  }
  description: string
}

record ChartInfo {
  @Searchable = {
    "fieldType": "KEYWORD",
    "searchTier": 1,
    "entityFieldName": "name"
  }
  chartName: string
}
In this example, all three fields (name, description, chartName) are automatically consolidated into _search.tier_1. A single search query against _search.tier_1:* will search across all these fields simultaneously, regardless of their individual aspect and field locations. The fieldType now primarily determines how each field is stored and accessed individually, while the tier determines how it participates in fulltext search.
Benefits of Migration:
- Better search performance through optimized indexing
- More organized search field structure
- Enhanced query capabilities with tier-based targeting
- Future-proof annotations that won't be deprecated
- Improved Elasticsearch mapping efficiency
@Relationship
This annotation is applied to fields inside an Aspect. This annotation creates edges between an Entity's Urn and the destination of the annotated field when the Entity is ingested. @Relationship annotations must be applied to fields of type Urn.
It takes the following parameters:
- name: string - A name used to identify the Relationship type.
- entityTypes: array[string] (Optional) - A list of entity types that are valid values for the foreign-key relationship field.
Example
Let's take a look at a real world example to see how this annotation is used. The Owner.pdl struct is referenced by
the Ownership.pdl aspect. Owned.pdl contains a relationship to a CorpUser or CorpGroup:
namespace com.linkedin.common

/**
 * Ownership information
 */
record Owner {

  /**
   * Owner URN, e.g. urn:li:corpuser:ldap, urn:li:corpGroup:group_name, and urn:li:multiProduct:mp_name
   */
  @Relationship = {
    "name": "OwnedBy",
    "entityTypes": [ "corpUser", "corpGroup" ]
  }
  owner: Urn

  ...
}
This annotation says that when we ingest an Entity with an Ownership Aspect, DataHub will create an OwnedBy relationship between that entity and the CorpUser or CorpGroup who owns it. This will be queryable using the Relationships resource in both the forward and inverse directions.
@UrnValidation
This annotation can be applied to Urn fields inside an aspect. The annotation can optionally perform one or more of the following:
- Enforce that the URN exists
- Enforce stricter URN validation
- Restrict the URN to specific entity types
Example
Using this example from StructuredPropertyDefinition, we are enforcing that the valueType URN must exist,
it must follow stricter Urn encoding logic, and it can only be of entity type dataType.
    @UrnValidation = {
      "exist": true,
      "strict": true,
      "entityTypes": [ "dataType" ],
    }
    valueType: Urn
Annotating Collections & Annotation Overrides
You will not always be able to apply annotations to a primitive field directly. This may be because the field is wrapped in an Array, or because the field is part of a shared struct that many entities reference. In these cases, you need to use annotation overrides. An override is done by specifying a fieldPath to the target field inside the annotation, like so:
 /**
   * Charts in a dashboard
   */
  @Relationship = {
    "/*": {
      "name": "Contains",
      "entityTypes": [ "chart" ]
    }
  }
  charts: array[ChartUrn] = [ ]
This override applies the relationship annotation to each element in the Array, rather than the array itself. This allows a unique Relationship to be created for between the Dashboard and each of its charts.
Another example can be seen in the case of tags. In this case, TagAssociation.pdl has a @Searchable annotation:
 @Searchable = {
    "fieldName": "tags",
    "fieldType": "URN_WITH_PARTIAL_MATCHING",
    "queryByDefault": true,
    "hasValuesFieldName": "hasTags"
  }
  tag: TagUrn
At the same time, SchemaField overrides that annotation to allow for searching for tags applied to schema fields
specifically. To do this, it overrides the Searchable annotation applied to the tag field of TagAssociation and
replaces it with its own- this has a different boostScore and a different fieldName.
 /**
   * Tags associated with the field
   */
  @Searchable = {
    "/tags/*/tag": {
      "fieldName": "fieldTags",
      "fieldType": "URN_WITH_PARTIAL_MATCHING",
      "queryByDefault": true,
      "boostScore": 0.5
    }
  }
  globalTags: optional GlobalTags
As a result, you can issue a query specifically for tags on Schema Fields via fieldTags:<tag_name> or tags directly
applied to an entity via tags:<tag_name>. Since both have queryByDefault set to true, you can also search for
entities with either of these properties just by searching for the tag name.