16 KiB
import FeatureAvailability from '@site/src/components/FeatureAvailability';
import Tabs from '@theme/Tabs'; import TabItem from '@theme/TabItem';
Metadata Ingestion
DataHub helps you discover and understand your organization's data by automatically collecting information about your data sources. This process is called metadata ingestion, allowing DataHub to automatically pull in:
- Table and column names from your databases
- Asset Lineage showing how information flows between systems
- Usage statistics revealing which datasets are most popular
- Data quality information including freshness and completeness
- Business context like ownership and documentation
This makes it simple to connect to popular platforms like Snowflake, BigQuery, dbt, and more, schedule automatic updates, and manage credentials securely.
Prerequisites and Permissions
To manage metadata ingestion in DataHub, you need appropriate permissions.
Option 1: Admin-Level Access
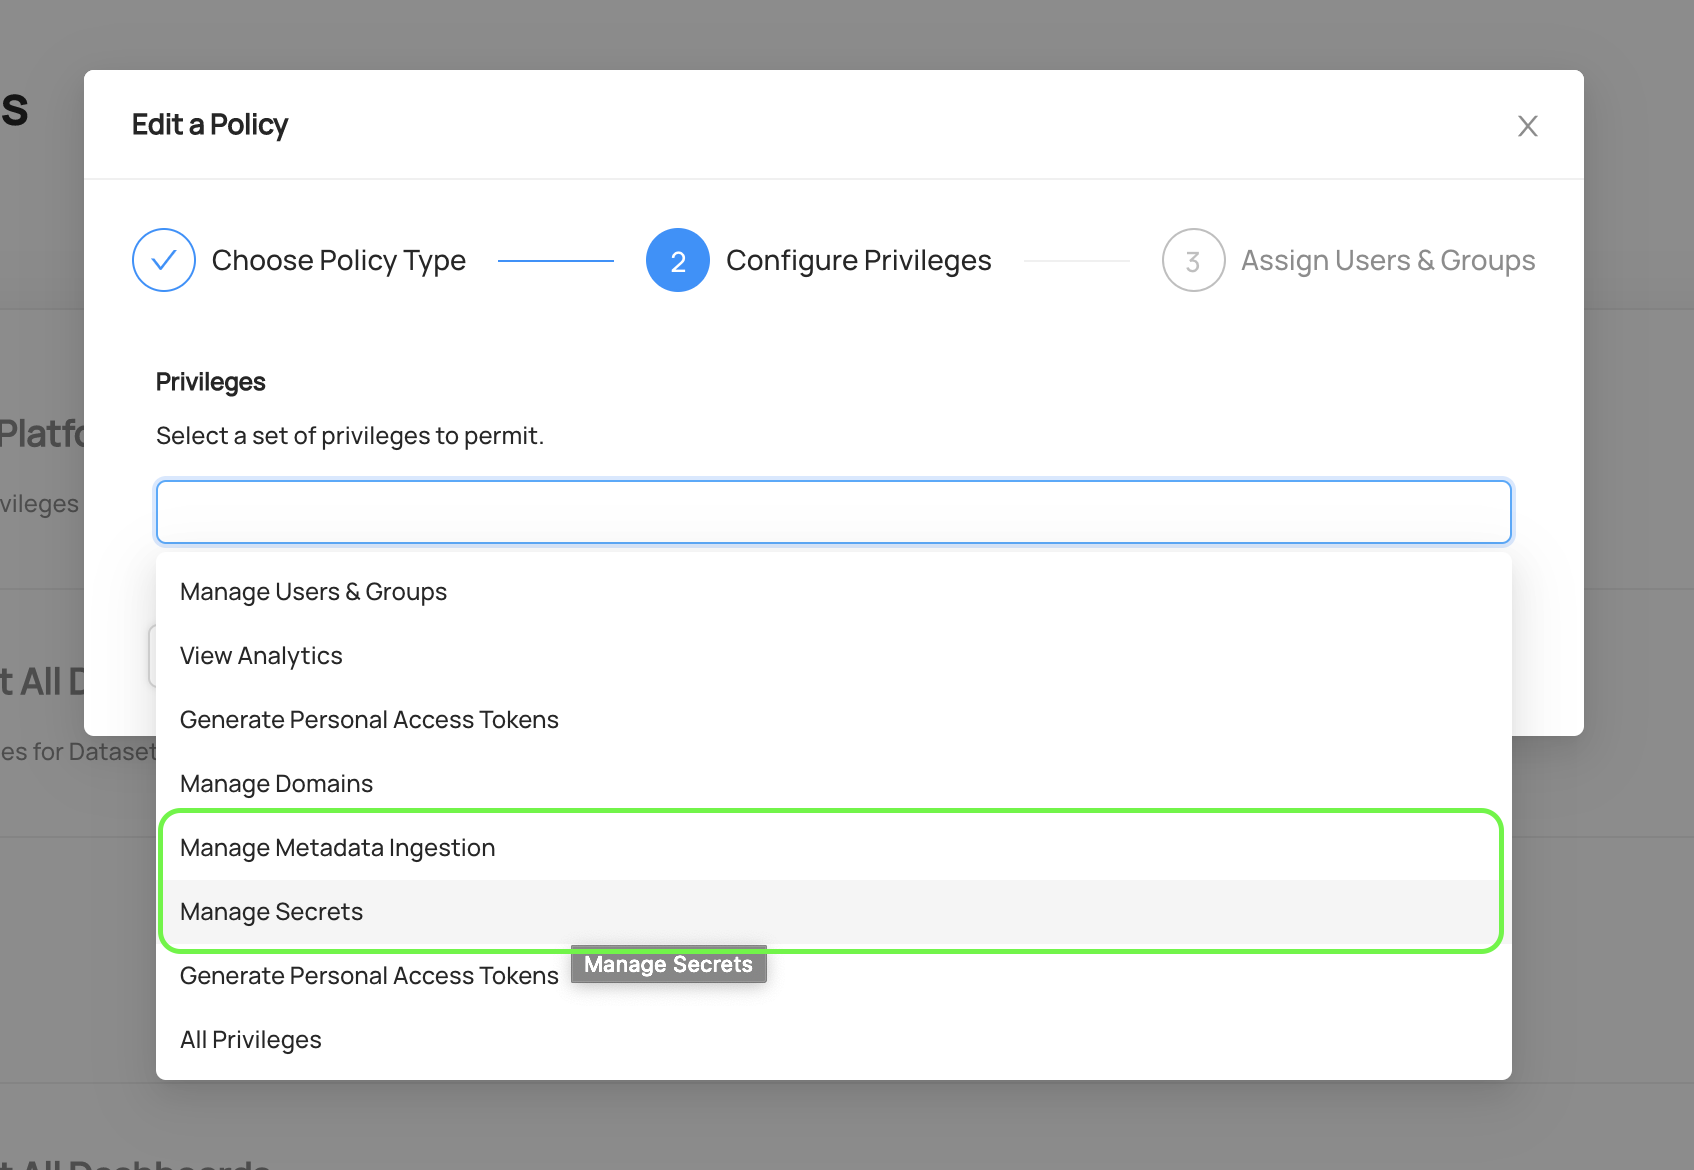
Users can be granted the following privileges for full administrative access to all ingestion sources:
Manage Metadata Ingestion- Provides complete access to create, edit, run, and delete all ingestion sourcesManage Secrets- Allows creation and management of encrypted credentials used in ingestion configurations
These privileges can be granted in two ways:
- Admin Role Assignment - Users assigned to the Admin Role receive these privileges by default
- Custom Policy with Platform Privileges - Create a Custom Policy that grants the
Manage Metadata IngestionandManage Secretsplatform privileges to specific users or groups
Option 2: Resource-Specific Policies
For more granular control, administrators can create Custom Policies that apply specifically to Ingestion Sources, allowing different users to have different levels of access:
- View - View ingestion source configurations and run history
- Edit - Modify ingestion source configurations
- Delete - Remove ingestion sources
- Execute - Run ingestion sources on-demand
Prerequisites:
- DataHub Core: Enable the
VIEW_INGESTION_SOURCE_PRIVILEGES_ENABLEDfeature flag - DataHub Cloud: Work with your customer success team to get the feature enabled
:::caution Important: Once this feature flag is enabled, any policies that apply to "All" resource types will now include Ingestion Sources, including the default read-only policies. This will make the Ingestion tab visible and potentially actionable depending on the applied privileges. Implement this with care if you have view-only policies that should not expose the Data Sources page. :::
Accessing the Ingestion Interface
Once you have the appropriate privileges, navigate to the Ingestion tab in DataHub.

On this page, you'll see a list of active Ingestion Sources. An Ingestion Source represents a configured connection to an external data system from which DataHub extracts metadata.
If you're just getting started, you won't have any sources configured. The following sections will guide you through creating your first ingestion source.
Creating an Ingestion Source
Step 1: Select a Data Source
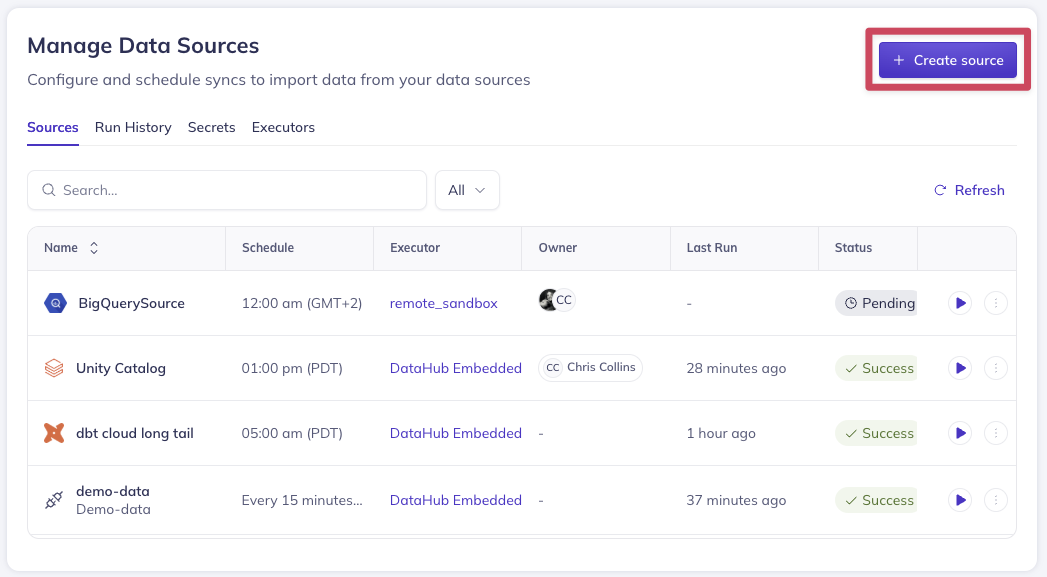
Begin by clicking + Create new source to start the ingestion source creation process.
Next, select the type of data source you want to connect. DataHub provides pre-built templates for popular platforms including:
- Data Warehouses: Snowflake, BigQuery, Redshift, Databricks
- Databases: MySQL, PostgreSQL, SQL Server, Oracle
- Business Intelligence: Looker, Tableau, PowerBI
- Streaming: Kafka, Pulsar
- And many more...
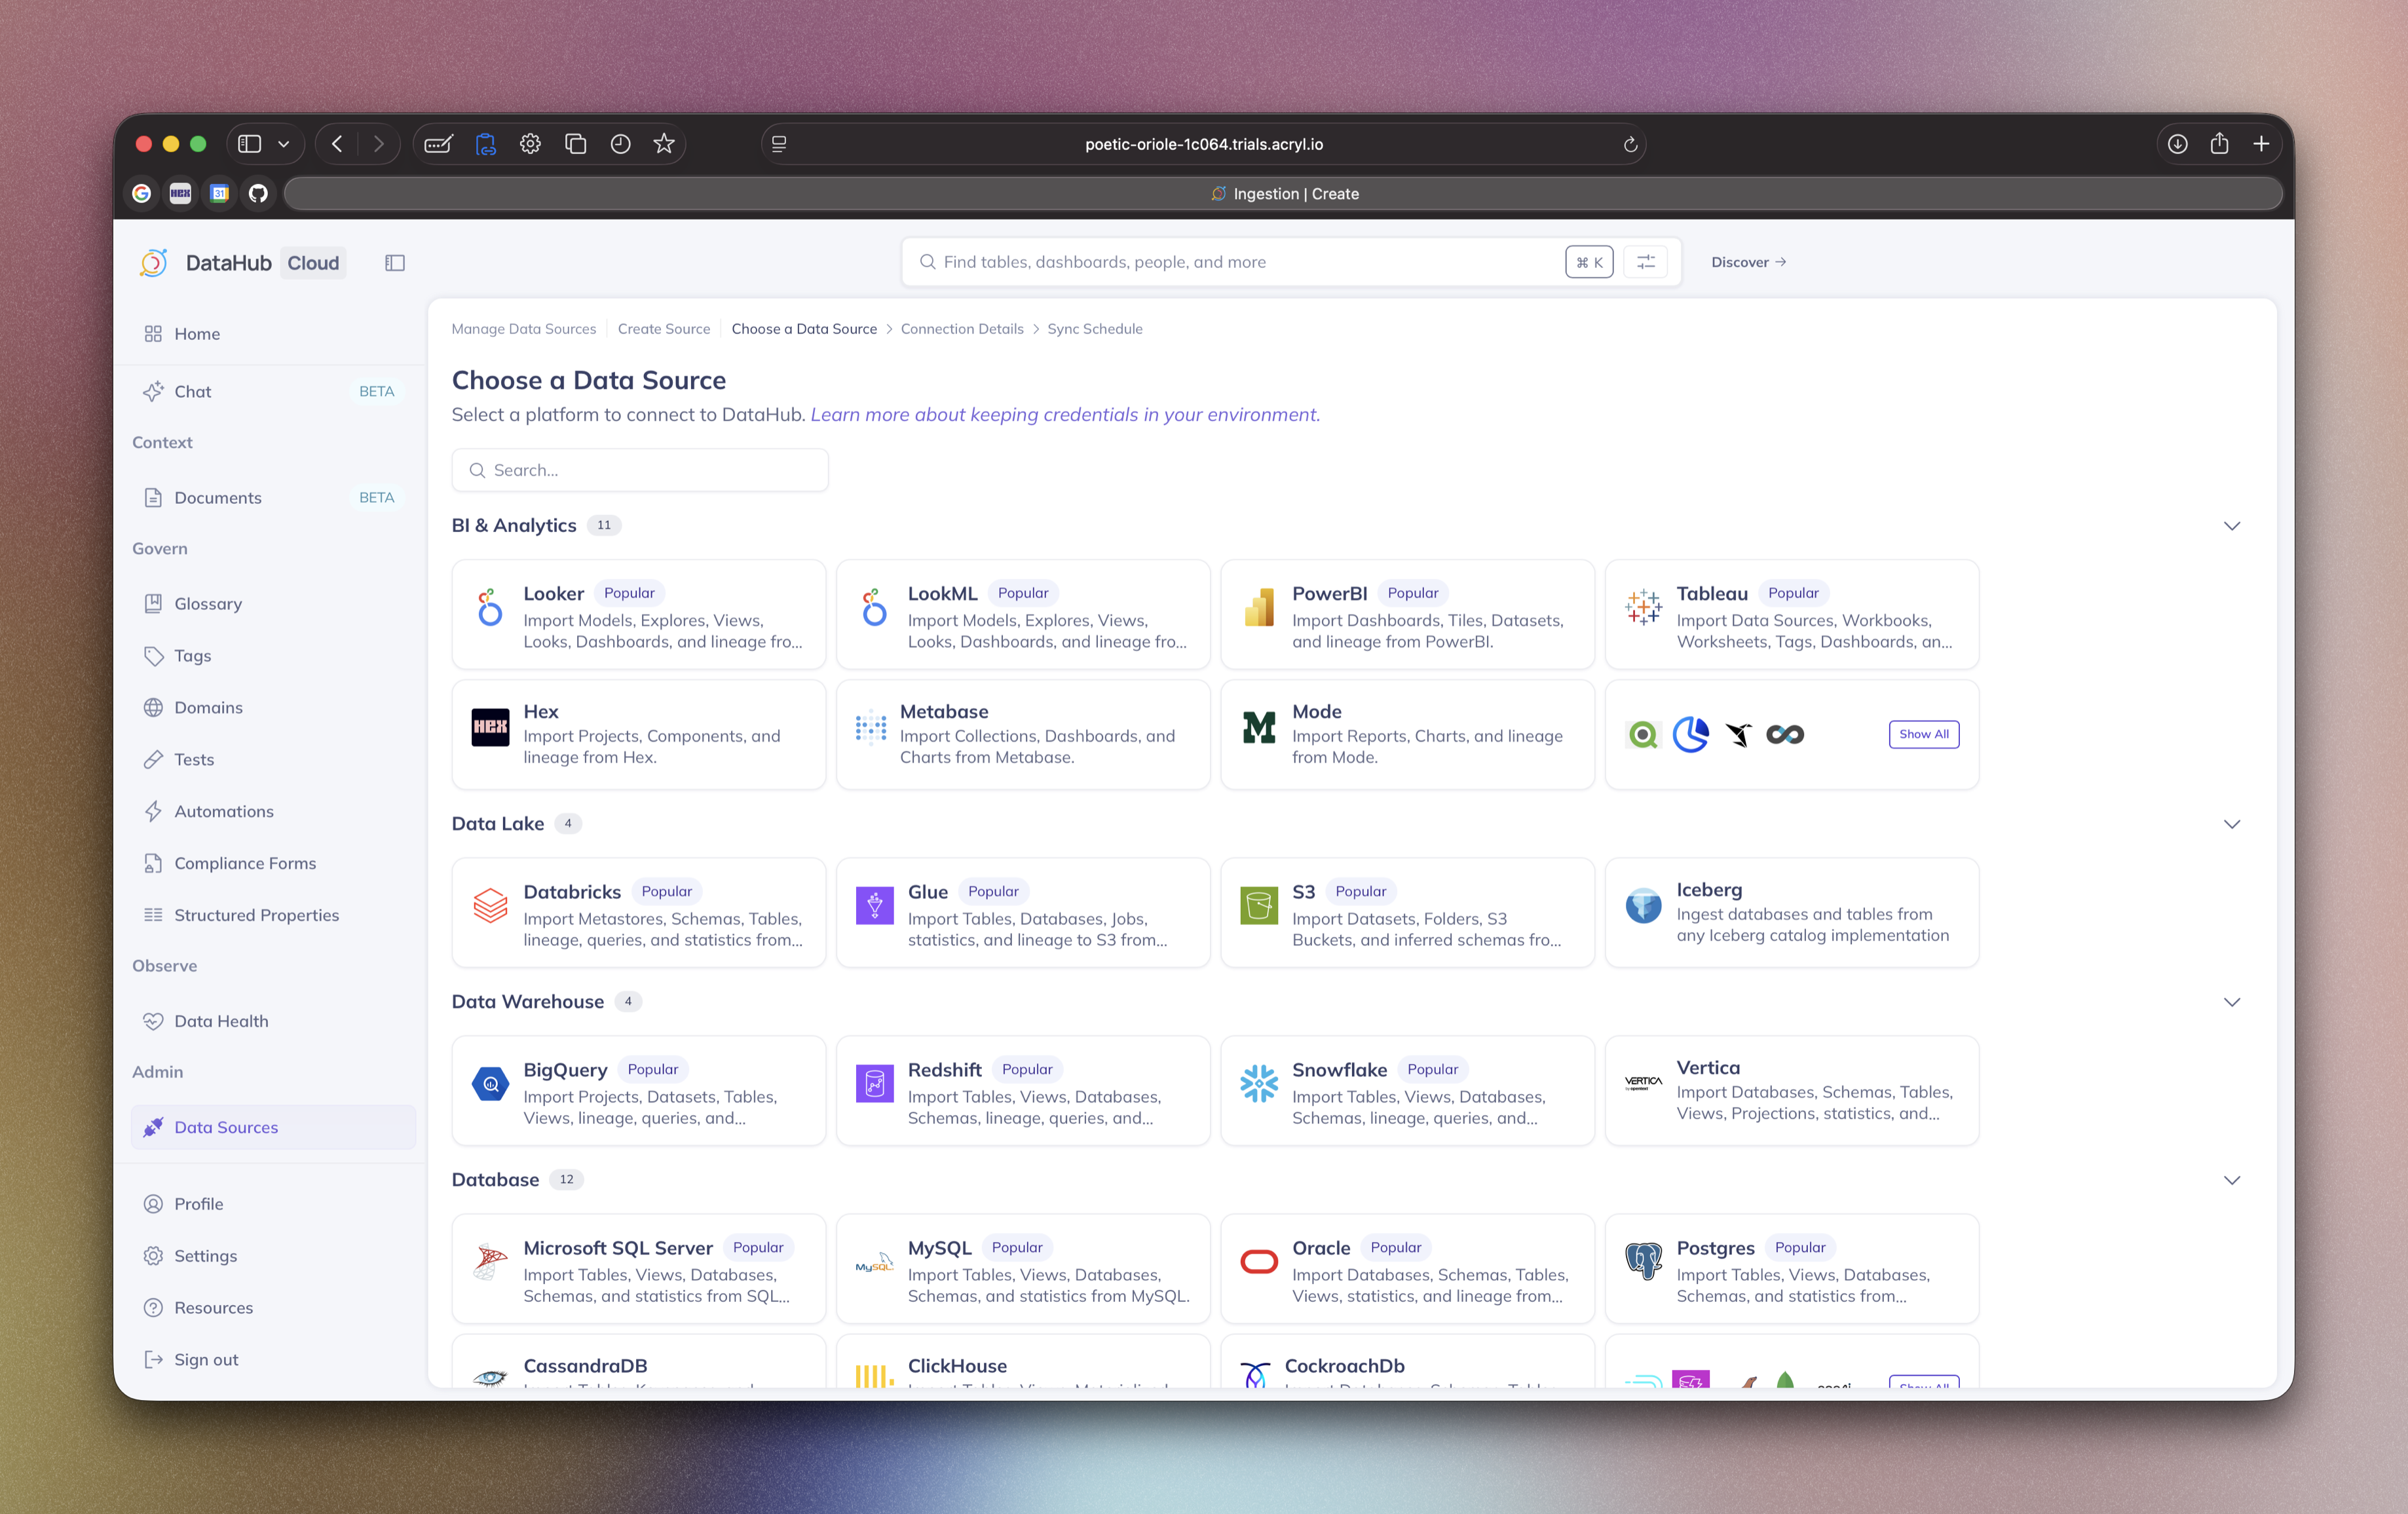
Select the template that matches your data source. If your specific platform isn't listed, you can choose Custom to configure a source manually, though this requires more technical knowledge.
Step 2: Configure Connection Details
After selecting your data source template, you'll be presented with a user-friendly form to configure the connection. The exact fields will vary depending on your chosen platform, but typically include:
Connection Information:
- Host/server address and port
- Database or project names
- Authentication credentials
Data Selection:
- Which databases, schemas, or tables to include
- Filtering options to exclude certain data
- Sampling and profiling settings
Managing Sensitive Information with Secrets
For production environments, sensitive information like passwords and API keys should be stored securely using DataHub's Secrets functionality.
To create a secret:
- Navigate to the Secrets tab in the Ingestion interface
- Click Create new secret
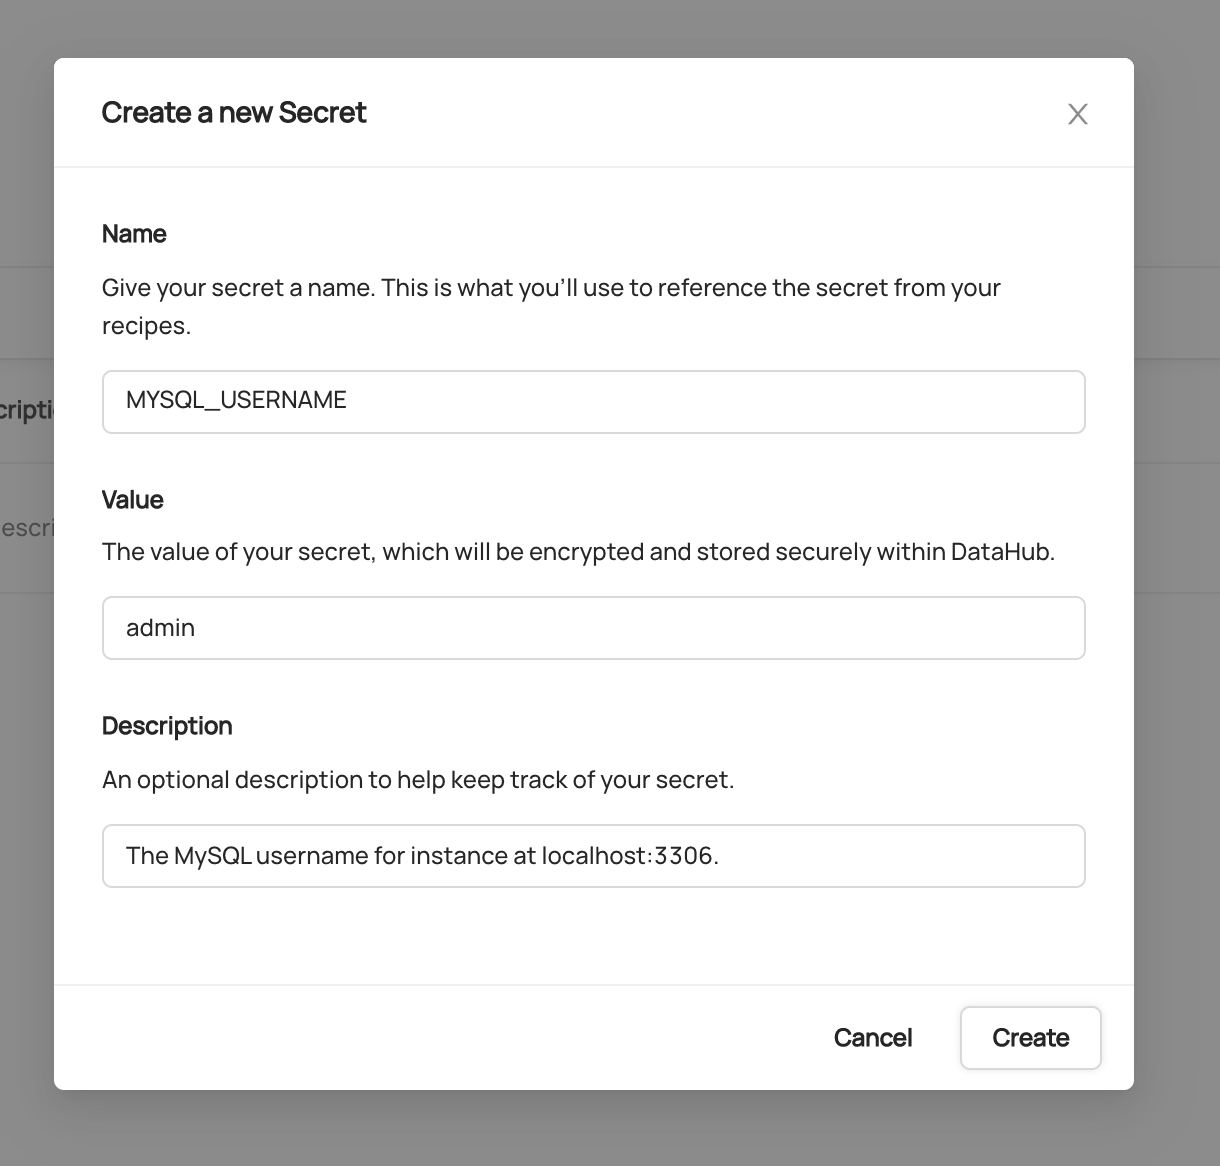
- Provide a descriptive name (e.g.,
BIGQUERY_PRIVATE_KEY) - Enter the sensitive value
- Optionally add a description
- Click Create
Once created, secrets can be referenced in your ingestion configuration forms using the dropdown menus provided for credential fields.
Security Note: Users with the
Manage Secretsprivilege can retrieve plaintext secret values through DataHub's GraphQL API. Ensure secrets are only accessible to trusted administrators.
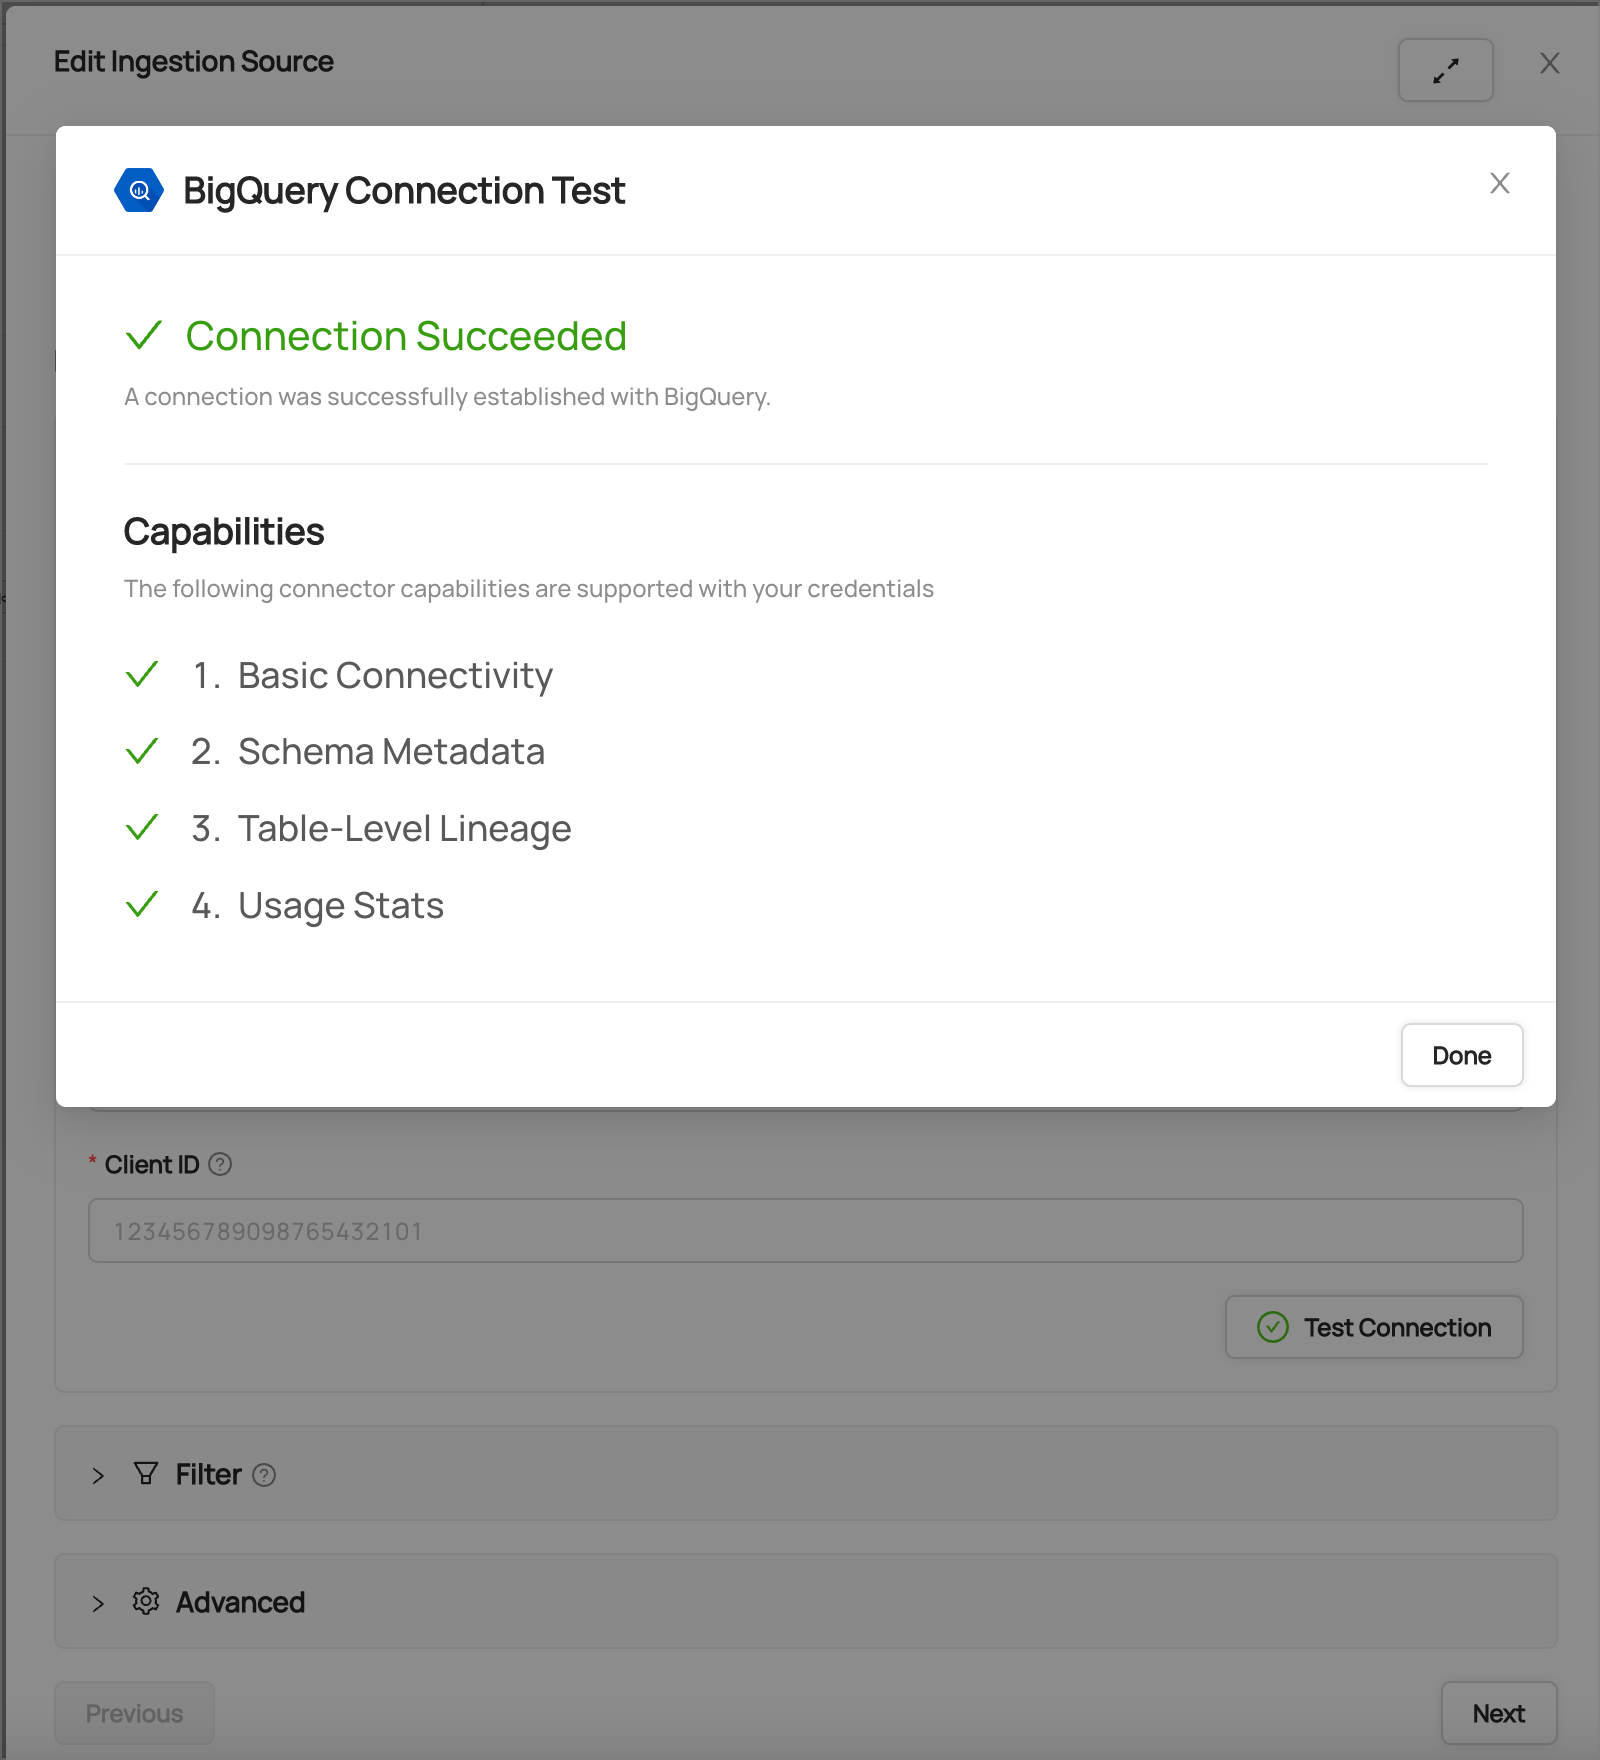
Step 3: Test Your Connection
Before proceeding, it's important to verify that DataHub can successfully connect to your data source. Most ingestion source forms include a Test Connection button that validates:
- Network connectivity to your data source
- Authentication credentials
- Required permissions for metadata extraction
If the connection test fails, review your configuration and ensure that:
- Network access is available between DataHub and your data source
- Credentials are correct and have sufficient permissions
- Any firewall rules allow the connection
Step 4: Schedule Execution (Optional)
You can configure automatic execution of your ingestion source on a regular schedule. This ensures your metadata stays up-to-date without manual intervention.
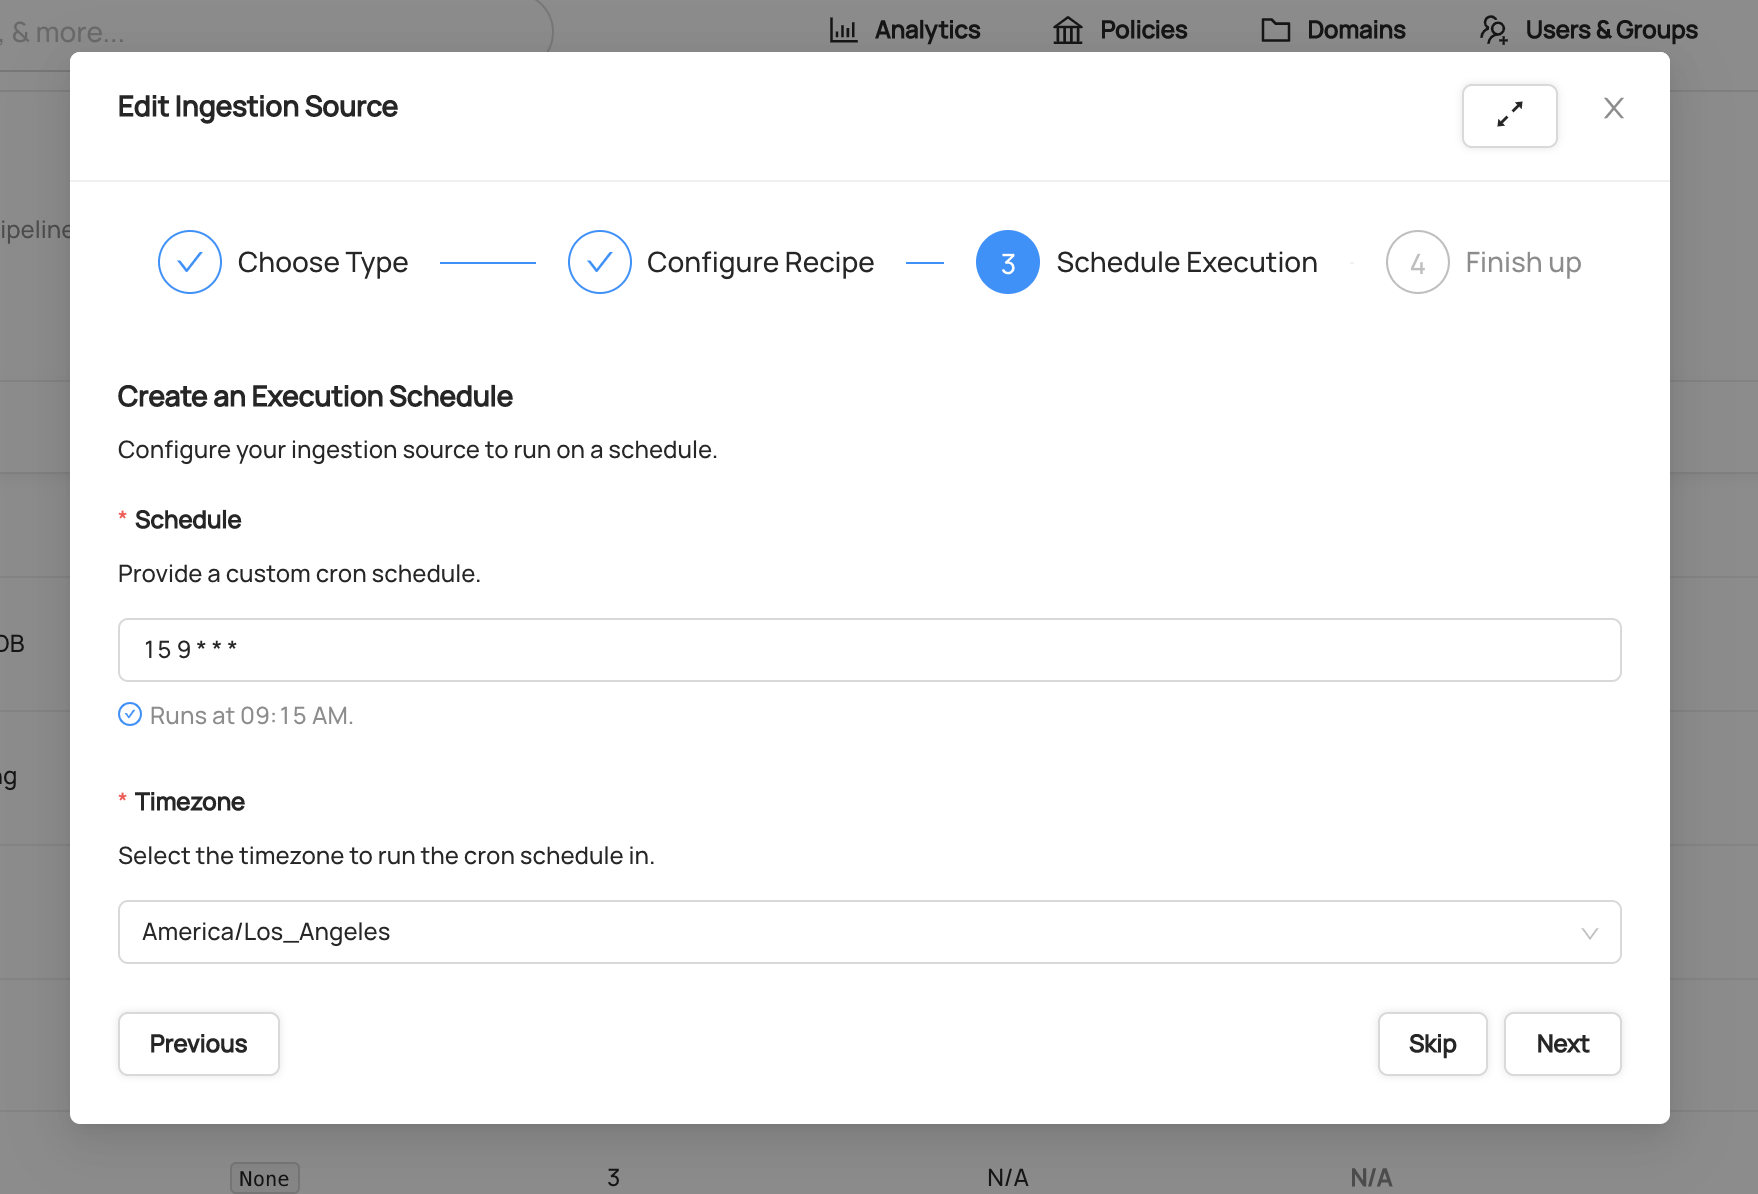
If you prefer to run ingestion manually or on an ad-hoc basis, you can skip the scheduling step entirely.
Step 5: Finish Up and Run
Finally, provide a descriptive name for your ingestion source that will help you and your team identify it later.
You can also assign Users and/or Groups as owners of this ingestion source. By default, you (the creator) will be assigned as an owner, but you can add additional owners or change this at any time after creation.
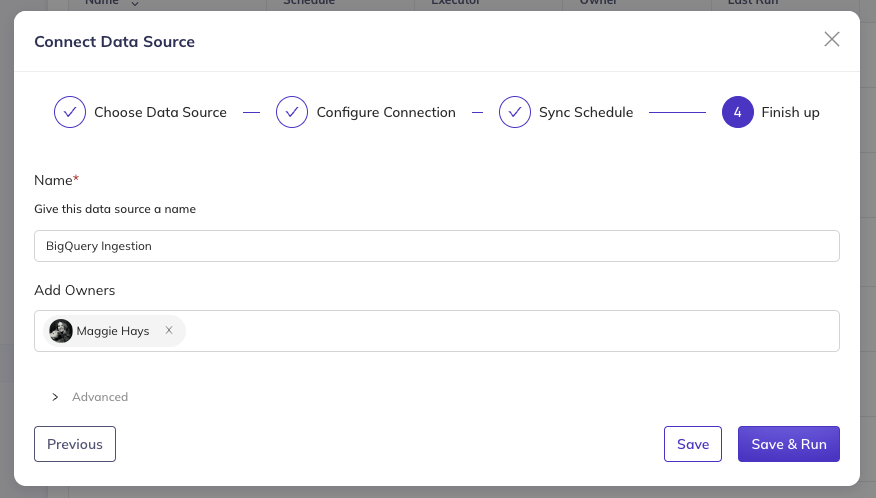
Click Save and Run to create the ingestion source and execute it immediately, or Save to create it without running.
Advanced Configuration Options
For users who need additional control, DataHub provides advanced configuration options:

- CLI Version: Specify a particular version of the DataHub CLI for ingestion execution
- Environment Variables: Set custom environment variables for the ingestion process
Running and Monitoring Ingestion
Executing an Ingestion Source
Once you've created your Ingestion Source, you can run it by clicking the 'Play' button. Shortly after, you should see the 'Last Status' column of the ingestion source change to Running, indicating that DataHub has successfully queued the ingestion job.

When ingestion completes successfully, the status will show as Success in green.

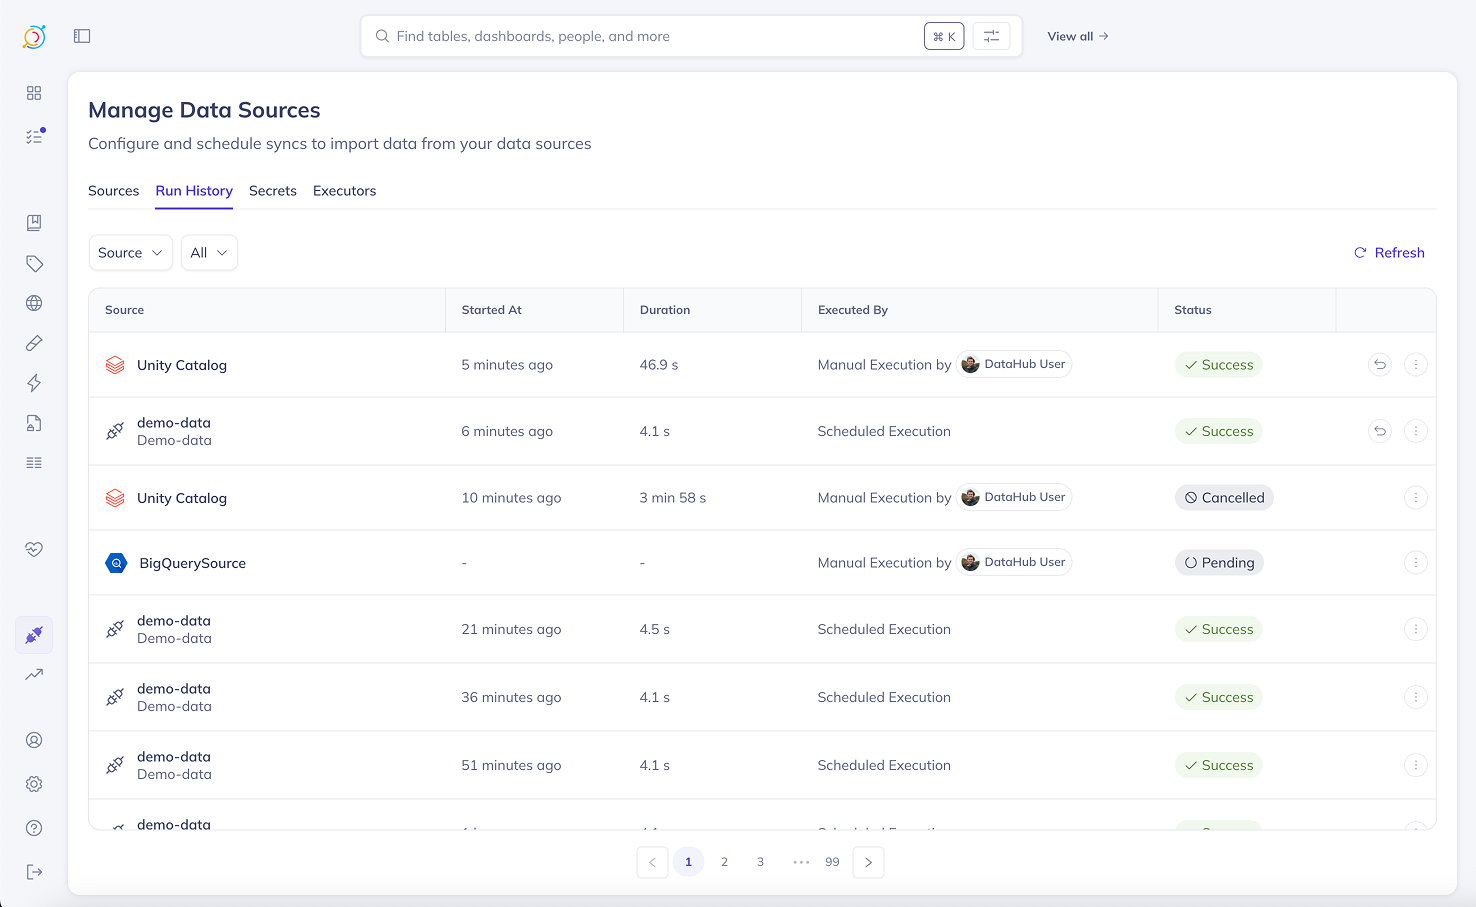
Viewing Run History
The Run History tab shows you a complete history of all your ingestion runs. Here you can:
- See all runs: View every ingestion execution across all your sources
- Check recent activity: Runs are listed with the most recent at the top
- Filter by source: Use the dropdown to see runs from a specific ingestion source
- Access from Sources tab: Click on any source's Last Run status or select View Run History from the source menu
This makes it easy to track your ingestion performance and troubleshoot any issues over time.
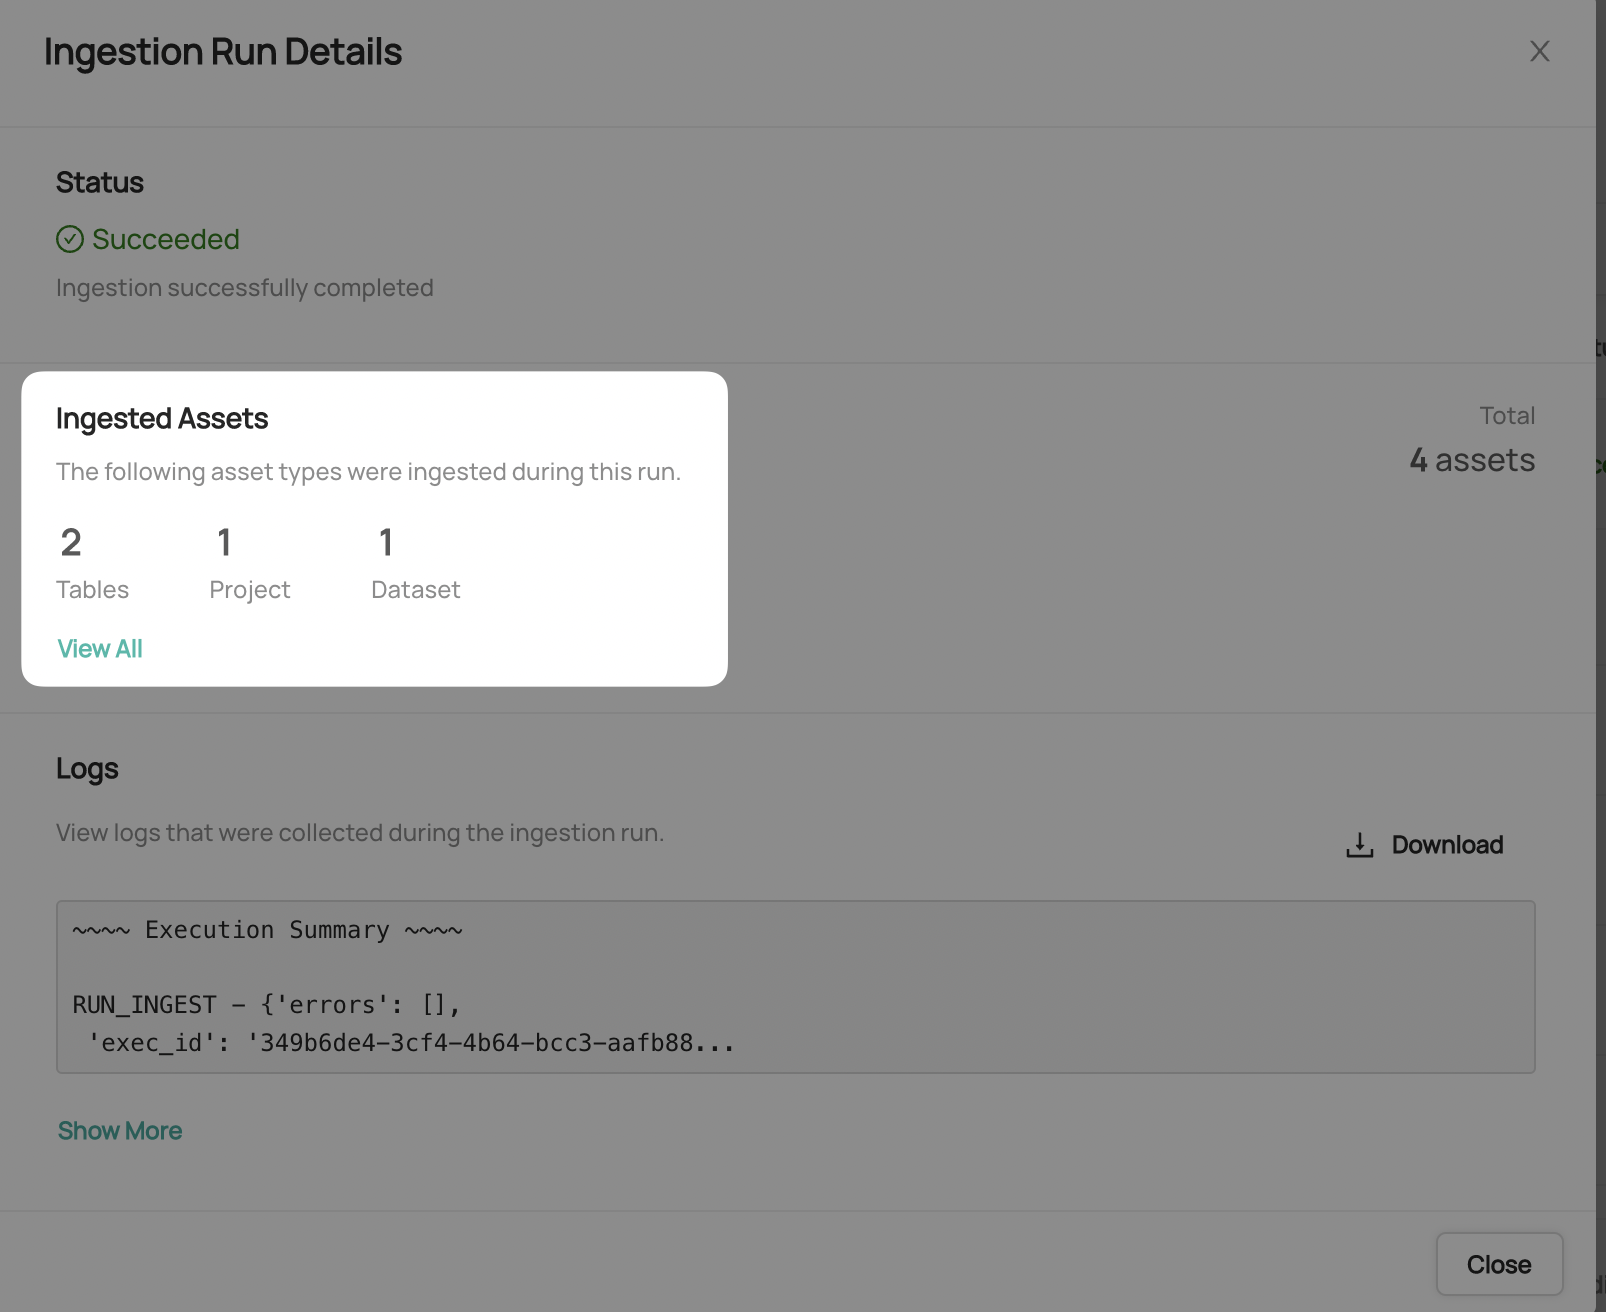
Viewing Ingestion Results
After successful ingestion, you can view detailed information about what was extracted:
- Click the Success status button on a completed ingestion run
- Select View All to see the list of ingested entities
- Click on individual entities to validate the extracted metadata
Cancelling Running Ingestion
If an ingestion run is taking too long or appears to be stuck, you can cancel it by clicking the 'Stop' button on the running job.

This is useful when encountering issues like:
- Network timeouts
- Ingestion source bugs
- Resource constraints
Troubleshooting Failed Ingestion
Common Failure Reasons
When ingestion fails, the most common causes include:
- Configuration Errors: Incorrect connection details, missing required fields, or invalid parameter values
- Authentication Issues: Wrong credentials, expired tokens, or insufficient permissions
- Network Connectivity: DNS resolution failures, firewall blocks, or unreachable data sources
- Secret Resolution Problems: Referenced secrets that don't exist or have incorrect names
- Resource Constraints: Memory limits, timeouts, or processing capacity issues
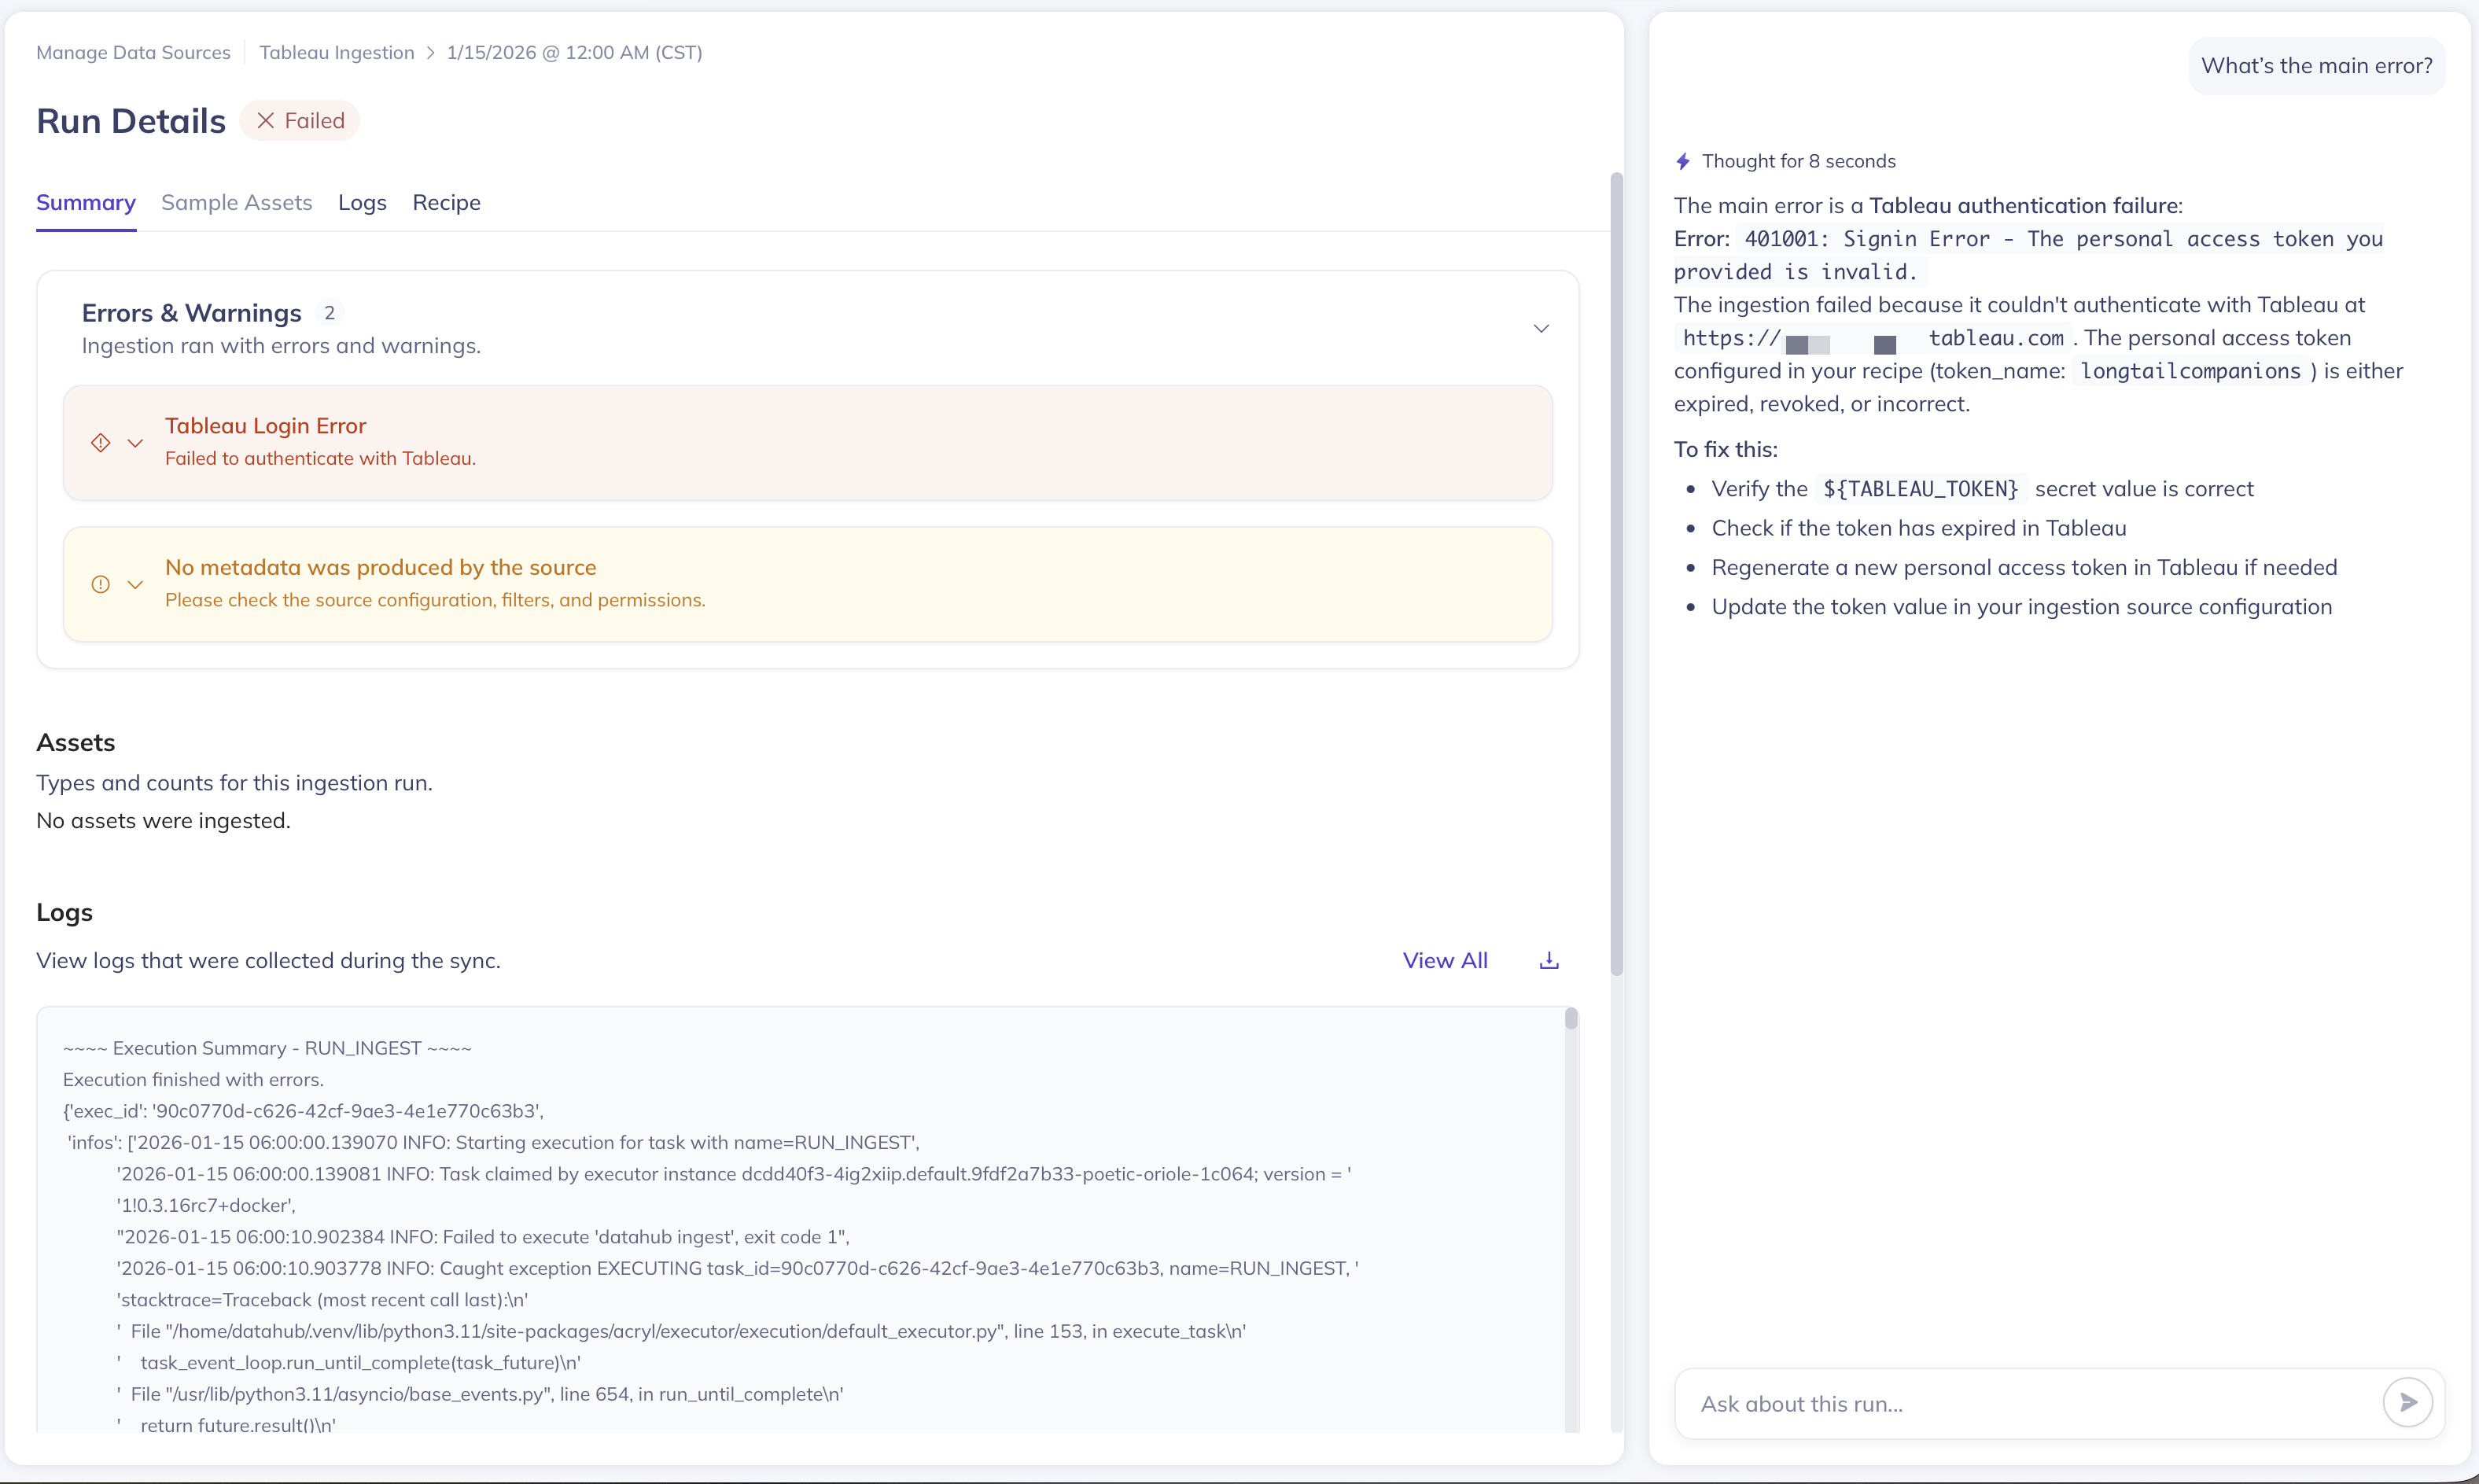
Viewing Detailed Logs
To diagnose ingestion failures, click on a run history status (Failed, Aborted) value to view and download comprehensive ingestion run logs.
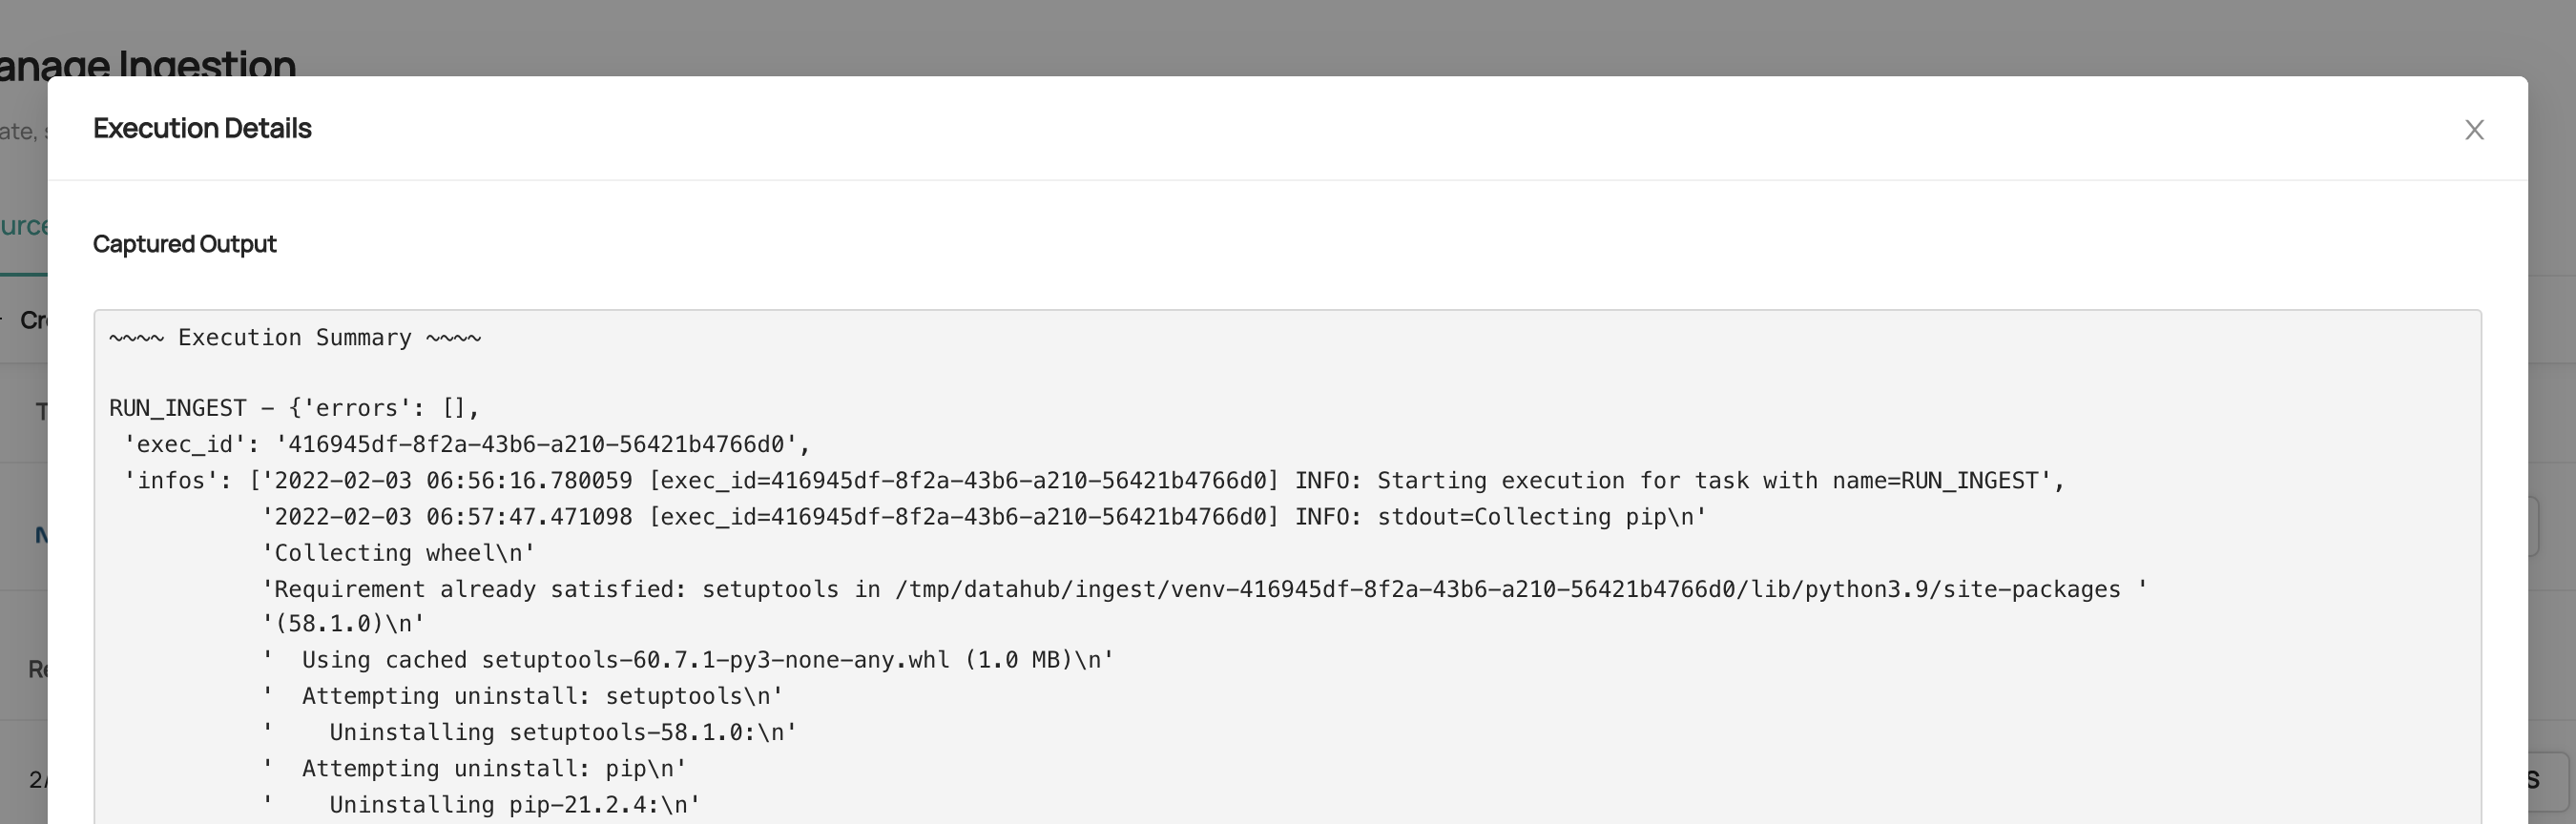
The logs provide detailed information about:
- Connection attempts and errors
- Authentication failures
- Data extraction progress
- Error messages and stack traces
Authentication for Secured DataHub Instances
If your DataHub instance has Metadata Service Authentication enabled, you'll need to provide a Personal Access Token in your configuration.

Advanced Configuration with YAML
While the UI-based forms handle most common ingestion scenarios, advanced users may need direct access to YAML configuration for:
- Custom ingestion sources not available in the UI
- Complex transformation pipelines
- Advanced filtering and processing logic
- Integration with external systems
For these advanced use cases, DataHub supports direct YAML recipe configuration. For detailed information about YAML-based configuration, including syntax and examples, see the Recipe Overview Guide.
You can deploy recipes using the CLI as mentioned in the CLI documentation for uploading ingestion recipes.
datahub ingest deploy --name "My Test Ingestion Source" --schedule "5 * * * *" --time-zone "UTC" -c recipe.yaml
Create ingestion sources using DataHub's GraphQL API using the createIngestionSource mutation endpoint.
mutation {
  createIngestionSource(
    input: {
      name: "My Test Ingestion Source"
      type: "mysql"
      description: "My ingestion source description"
      schedule: { interval: "*/5 * * * *", timezone: "UTC" }
      config: {
        recipe: "{\"source\":{\"type\":\"mysql\",\"config\":{\"include_tables\":true,\"database\":null,\"password\":\"${MYSQL_PASSWORD}\",\"profiling\":{\"enabled\":false},\"host_port\":null,\"include_views\":true,\"username\":\"${MYSQL_USERNAME}\"}},\"pipeline_name\":\"urn:li:dataHubIngestionSource:f38bd060-4ea8-459c-8f24-a773286a2927\"}"
        version: "0.8.18"
        executorId: "mytestexecutor"
      }
    }
  )
}
Note: Recipe must be double quotes escaped when using GraphQL
Frequently Asked Questions
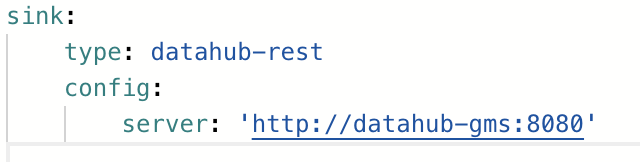
Why does ingestion fail with 'Failed to Connect' errors in Docker environments?
If you're running DataHub using datahub docker quickstart and experiencing connection failures, this may be due to network configuration issues. The ingestion executor might be unable to reach DataHub's backend services.
Try updating your ingestion configuration to use the Docker internal DNS name:
What does a dash mark (-) status mean and how do I fix it?
If your ingestion source shows a dash mark (-) status and never changes to 'Running', this could mean:
- The source has never been triggered to run - Try clicking the "Play" button to execute the source
- The DataHub actions executor is not running or healthy (DataHub Core users only)
If clicking "Play" doesn't resolve the issue, DataHub Core users should diagnose their actions container:
- Check container status with
docker ps - View executor logs with
docker logs <container-id> - Restart the actions container if necessary
When should I use CLI/YAML instead of UI ingestion?
Consider using CLI-based ingestion when:
- Your data sources aren't reachable from DataHub's network (use remote executors for DataHub Cloud)
- You need custom ingestion logic not available in UI templates
- Your ingestion requires local file system access
- You want to distribute ingestion across multiple environments
- You need complex transformations or custom metadata processing
Additional Resources
- Demo Video: Watch a complete UI ingestion walkthrough
- Quick Start Guides: Step-by-step setup instructions for popular data sources
- Recipe Documentation: Comprehensive YAML configuration reference
- Integration Catalog: Browse all supported data sources and their features